-
Q:FahrradkompatibilitätDer Xplova NOZA S ist mit den meisten Fahrradtypen kompatibel; Ausnahmen kann es allerdings bei verschiedenen Eingangrädern, Bahnrädern, Liegerädern und einigen Steckachsenrädern geben.
- Nabentypen: 130/135 mm Schnellspanner, 12 x 142/12 x 148 mm Steckachse
- Größe des Hinterreifens:
Straße: 650c, 700c
Berg: 24", 26"
- Antrieb (mit zusätzlichem Kauf): 8/9/10/11-fach SRAM/Shimano
-
Q:GerätekompatibilitätWindows/Mac
Der Xplova NOZA S unterstützt verschiedene Windows- und Mac-Anwendungen mit Bluetooth- und/oder ANT+-Funktionen.
Drittanbieteranwendungen
Der Xplova NOZA S kennt das ANT+ FE-C & Bluetooth-Protokoll, er ist also mit vielen Drittanbieteranwendungen kompatibel, darunter Zwift, TrainerRoad, PREPRO, Bkool, Onelap, Thinkrider, Road Grand Tours und viele mehr.
-
Q:Design-SpezifikationenAbmessungen (installiert): 620 x 518 x 453 mm
Gesamtgewicht (ohne Verpackung): 16,5 kg
Gewicht des Schwungrads: 5,7 kg
Geräuschpegel: 58 dB (bei 30 km/h)
Maximale Leistung: 2.500 W (bei 58 km/h)
Maximale simulierte Steigung: 18 % (bei 70 kg)
Widerstandstyp: Elektromagnetisch
Genauigkeit: +/- 2,5 %
Verbindung: ANT+, ANT+ FE-C und Bluetooth Smart
Firmware aktualisierbar: Ja
Elektrische Anforderungen: 100 bis 240 V ~ 1,5 A 50-60 Hz
-
Q:Verpackungsinhalt1. Xplova NOZA S
2. Vorderes Bein
3. Hinteres Bein
4. Muttern (2)
5. Schrauben (2)
6. 1,8 mm Abstandhalter
7. Antriebsseitenadapter für 130 mm und 135 mm Schnellspanner
8. Antriebsseitenadapter für 12 x 142 und 12 x 148 Steckachse
9. Umkehrbarer Nabenabstandhalter für Steckachsen
10. Drehknopf zur Höhenanpassung
11. Sechskantwerkzeug
12. Schnellspannvorrichtung
13. Netzteil
* Vorsicht: Die Nutzung von Drittanbieternetzteilen, die nicht von Xplova bereitgestellt wurden, kann dauerhafte Schäden an Ihrem Xplova NOZA S verursachen
-
Q:ProduktpflegeDer Xplova NOZA S erfordert nur geringen Reinigungs- und Wartungsaufwand, wenn sich Schmutz ansammelt. Wenn er gereinigt werden muss, entfernen Sie alle Ablagerungen und verwenden Sie ein feuchtes, weiches Tuch, um die Oberfläche abzuwischen. Achten Sie dabei darauf, dass in keinen Teil des Xplova NOZA S Feuchtigkeit gelangt. Vermeiden Sie auch die Nutzung von starken Reinigungsmitteln, da diese Ihren Xplova NOZA S beschädigen bzw. dessen Lebensdauer verringern können.
-
Q:Cassette compatibilityFor 9-speed or 10-speed cassette:
Before attaching a 9-speed or 10-speed cassette, you need to put the 1.8mm cassette washer (spacer included in the package) onto the cassette body first and then secure the cassette tightly on the NOZA S cassette body as mentioned above.
For 11-speed cassette:
Attach the cassette onto the cassette body manually and use the cassette nut to secure it on the cassette body. Use the cassette removal socket to secure it tightly on the NOZA S cassette body (the tool is not included).

-
Q:Compatible APP - Xplova WorkoutPlease follow these steps for more simulated routes for Xplova Workout App.
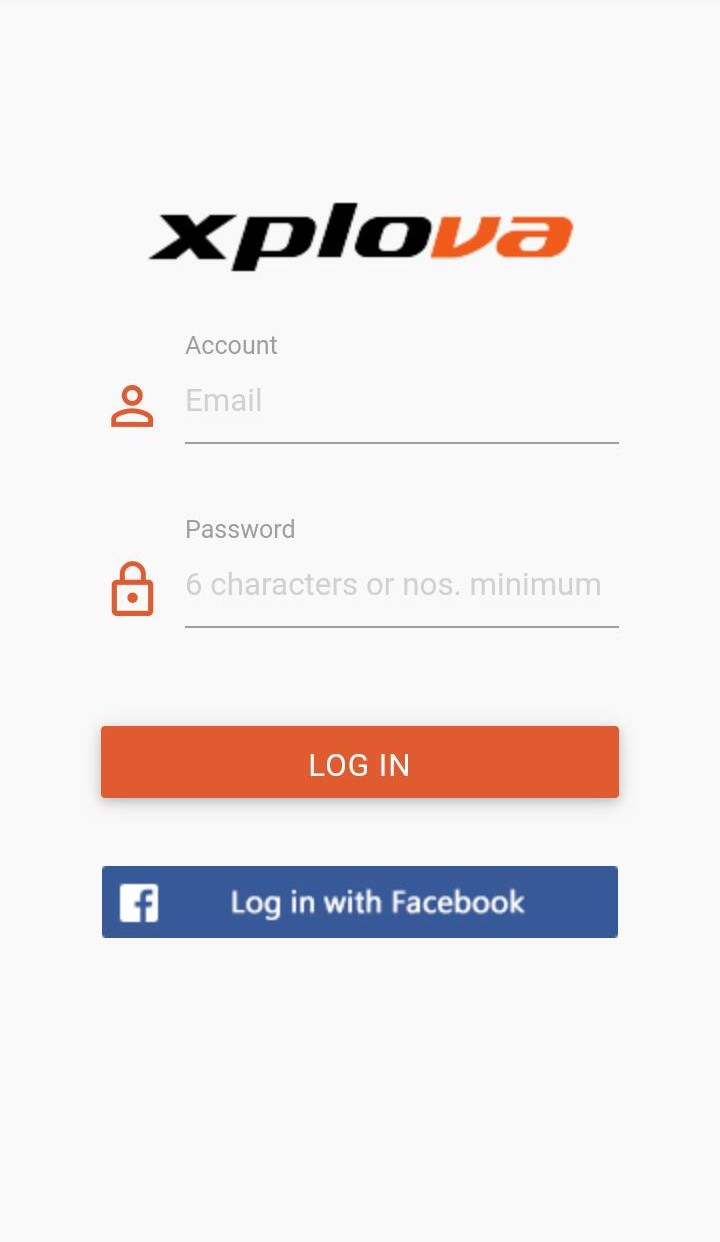
1. Visit Xplova website https://www.xplova.com/tw/ to register an account (if you don't have one with us).
2. After log-in, find a route that interest you and click the star icon to place it into your collection.
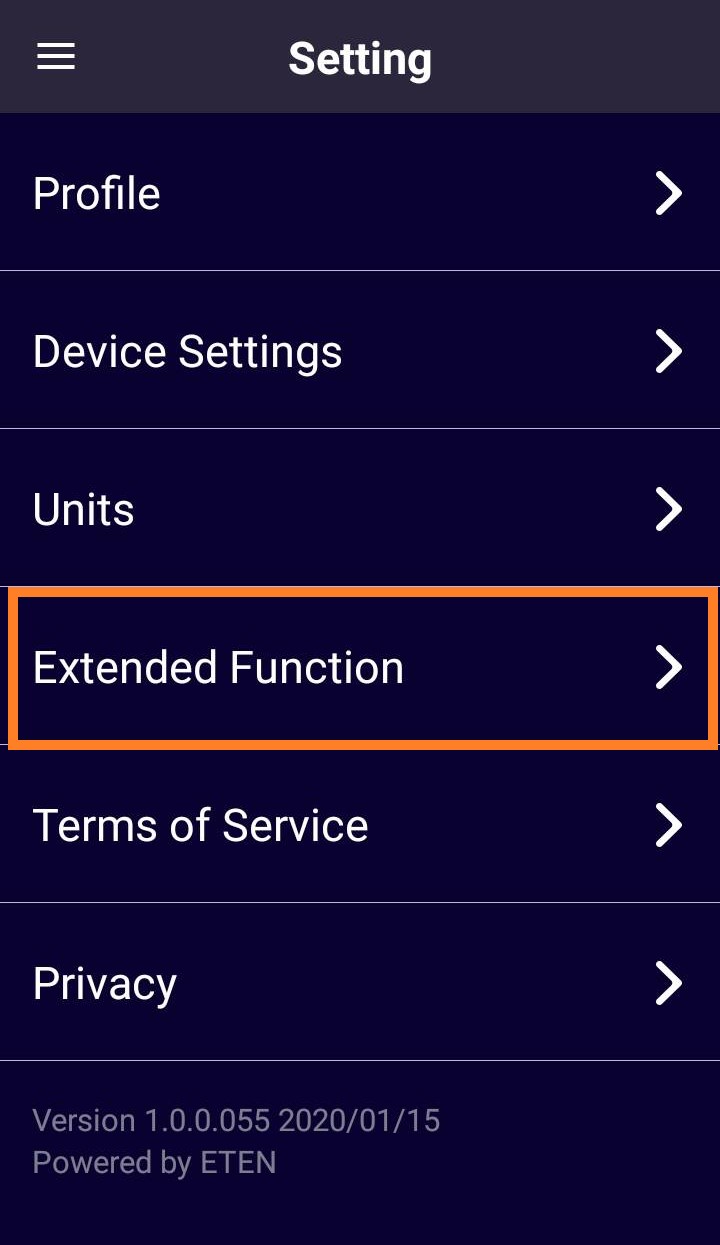
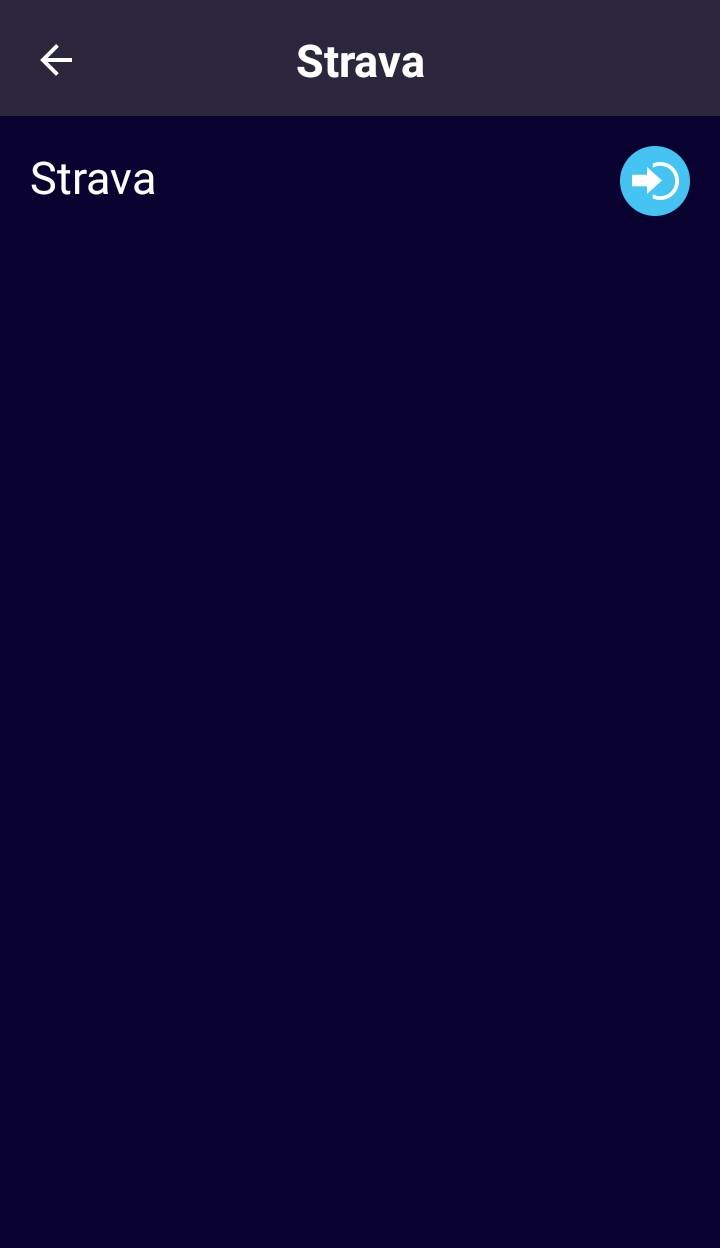
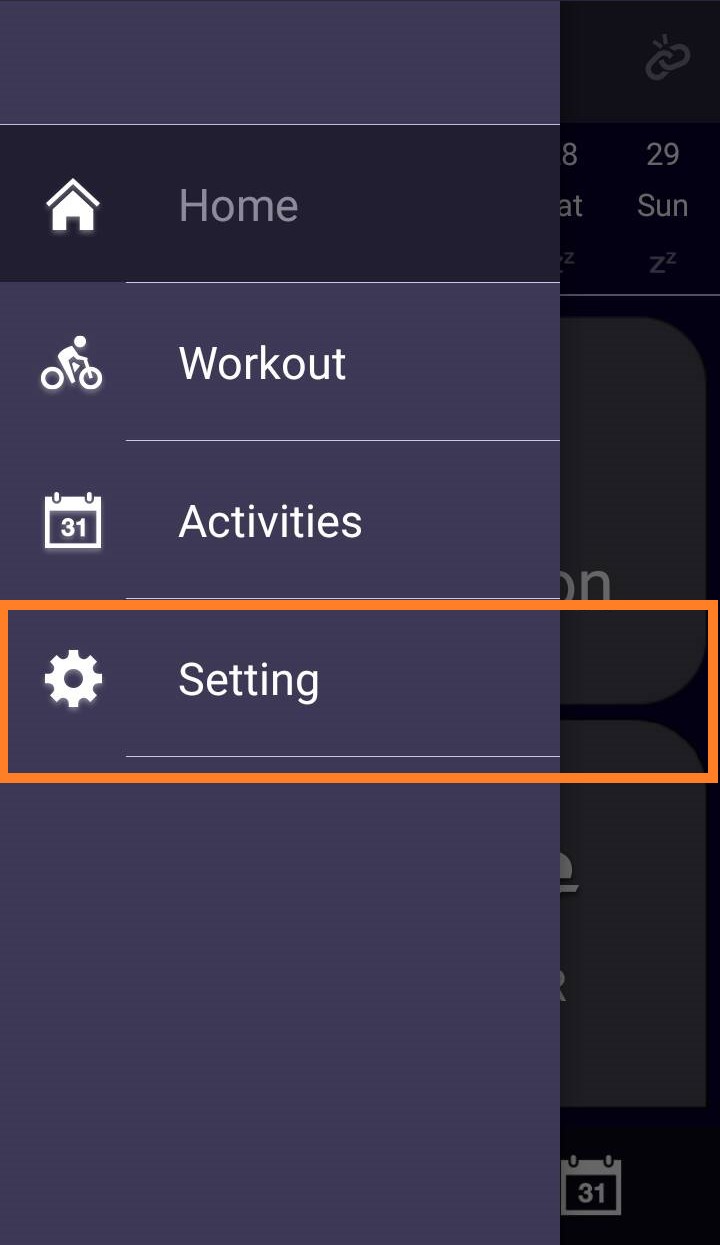
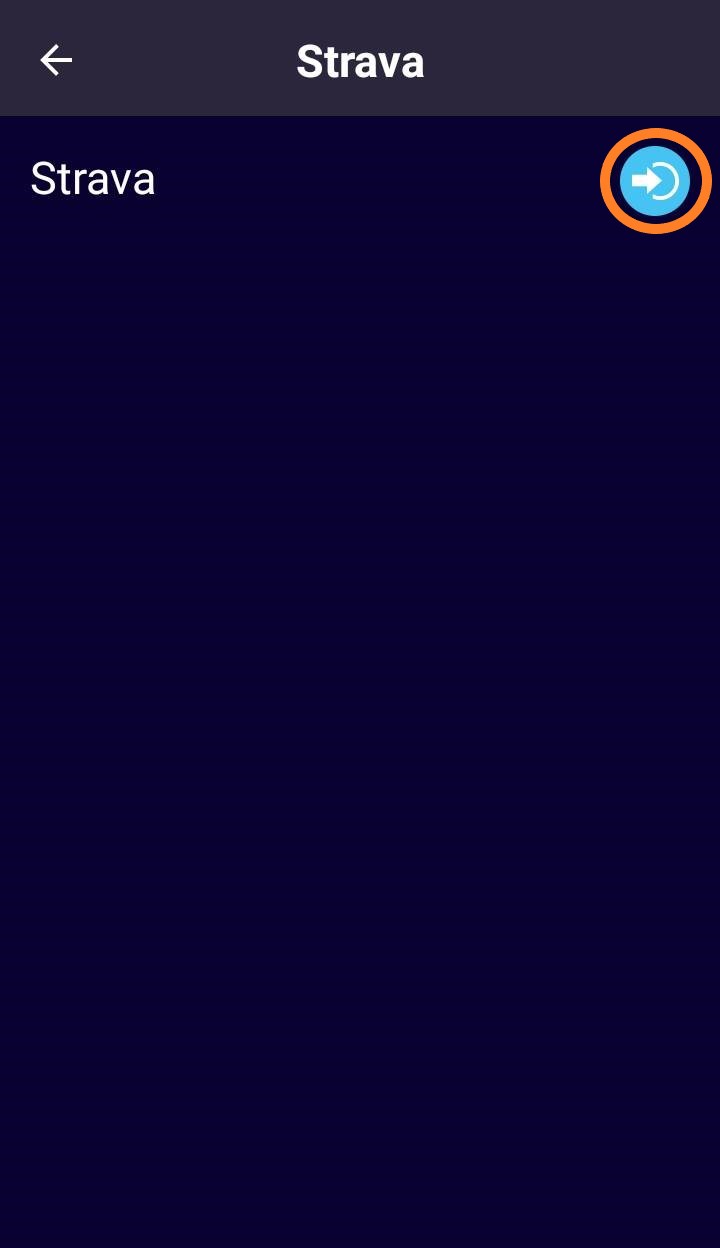
3. Go to Xplova Workout > Extended Funtionn > Choose Xplova to connect with your Xplova registered account.
The routes you saved in collection will automatically download to Xplova Workout App, it might take about a minute for the sync process.

-
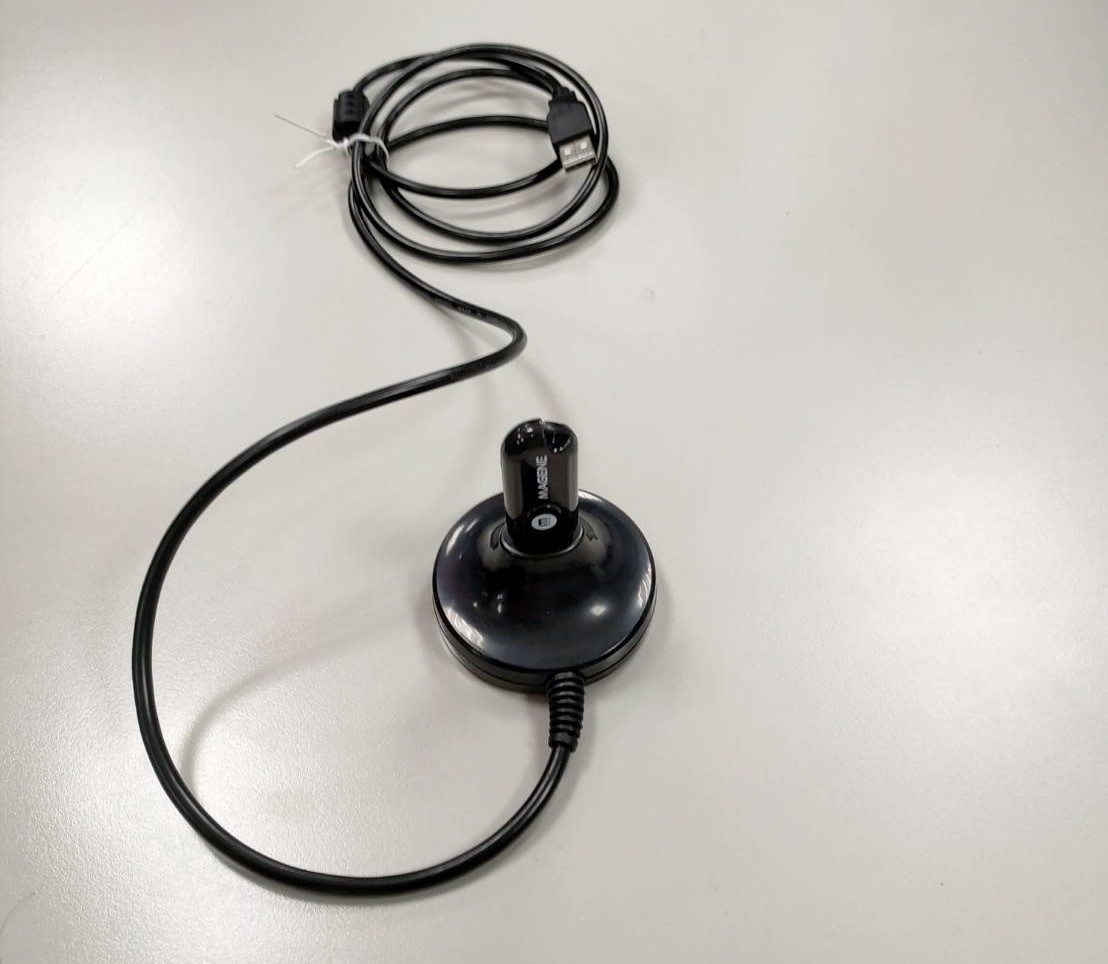
Q:Compatible APP - RouvySupport Rouvy PC/NB connection through ANT+ USB (see photo referance).
Currently, the Noza S doesn't support Rouvy smartphone app. It's still under compatibility development and testing.
-
Q:Compatible APP - othersIf you intend to ride some of the popluar software like Zwift or Onelap with a laptop, we highly recommend to connect the Noza S communication via ANT+.
Every laptop may have different build-in bluetooth chip, and the stability may very among all laptop brands so we recommend to connect these virtual games via ANT+ or check with the game developer for accetpable Bluetooth communication.
-
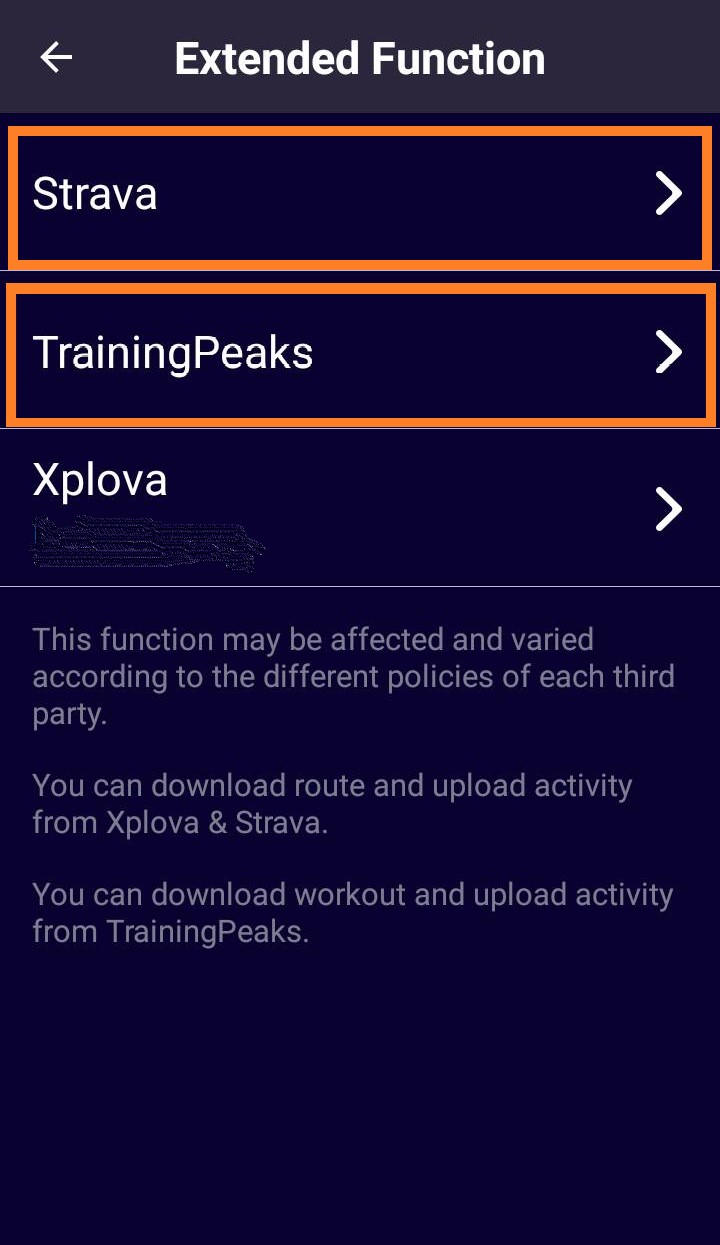
Q:Download routes from Strava or Training PeakFor the best compatibility, we recommend to plan a route on https://www.xplova.com/gb/route. To ride the route recorded through Strava or TrainingPeak, you must sync your account under the Xplova Workout APP setting.

-
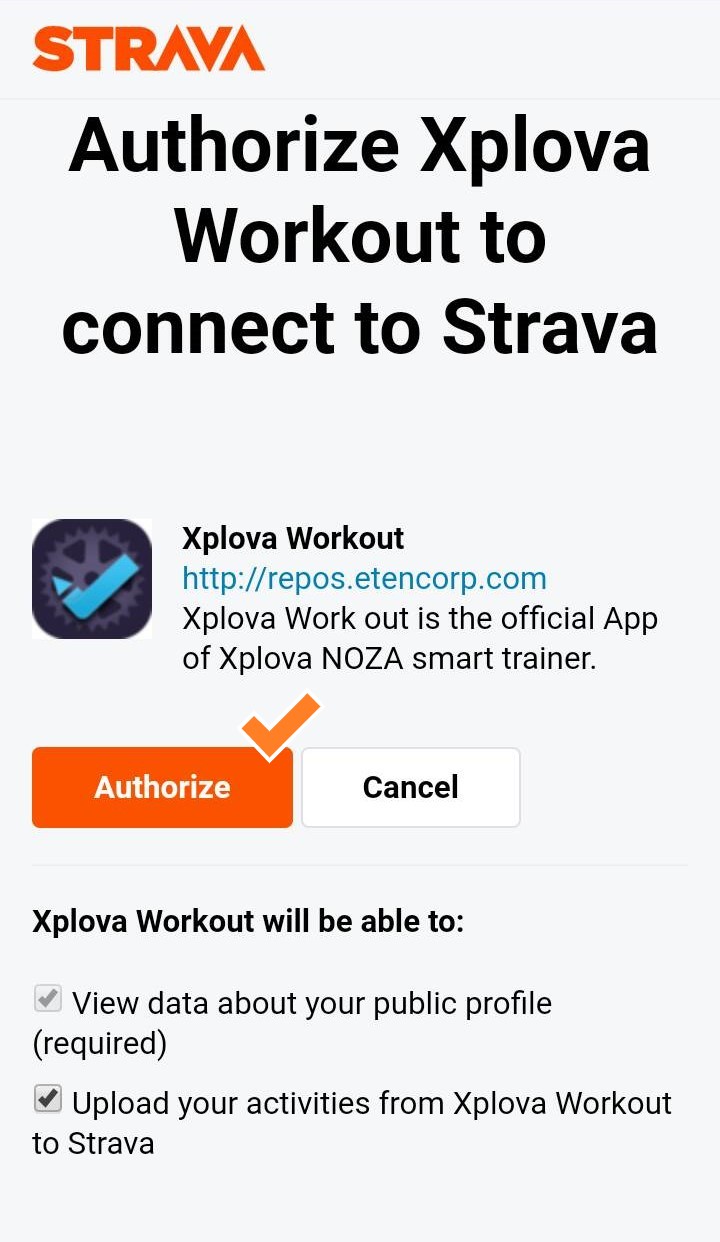
Due to the recent announcement from StravaDue to the recent announcement from Strava, Xplova Workout App will be affected due to the Strava subscription change. Cyclists can no longer pair with Strava to download routes and upload cycling data to Strava. https://www.strava.com/subscription/whats-new
-
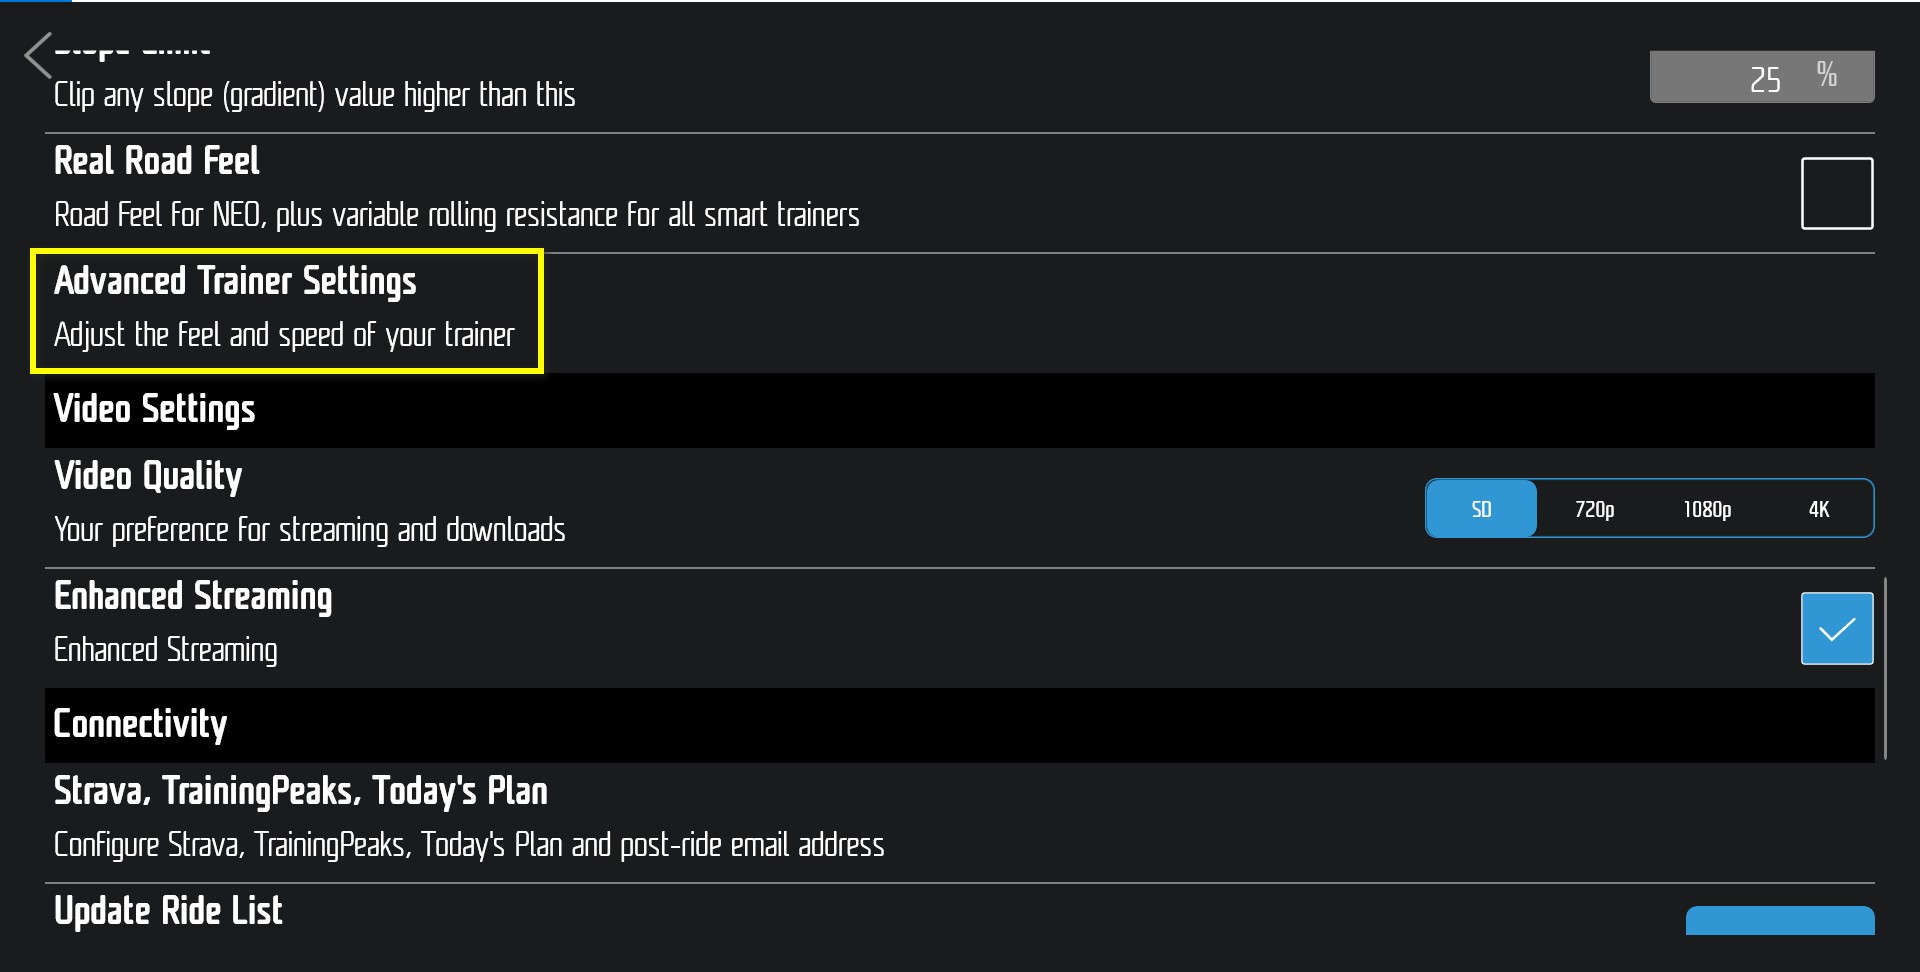
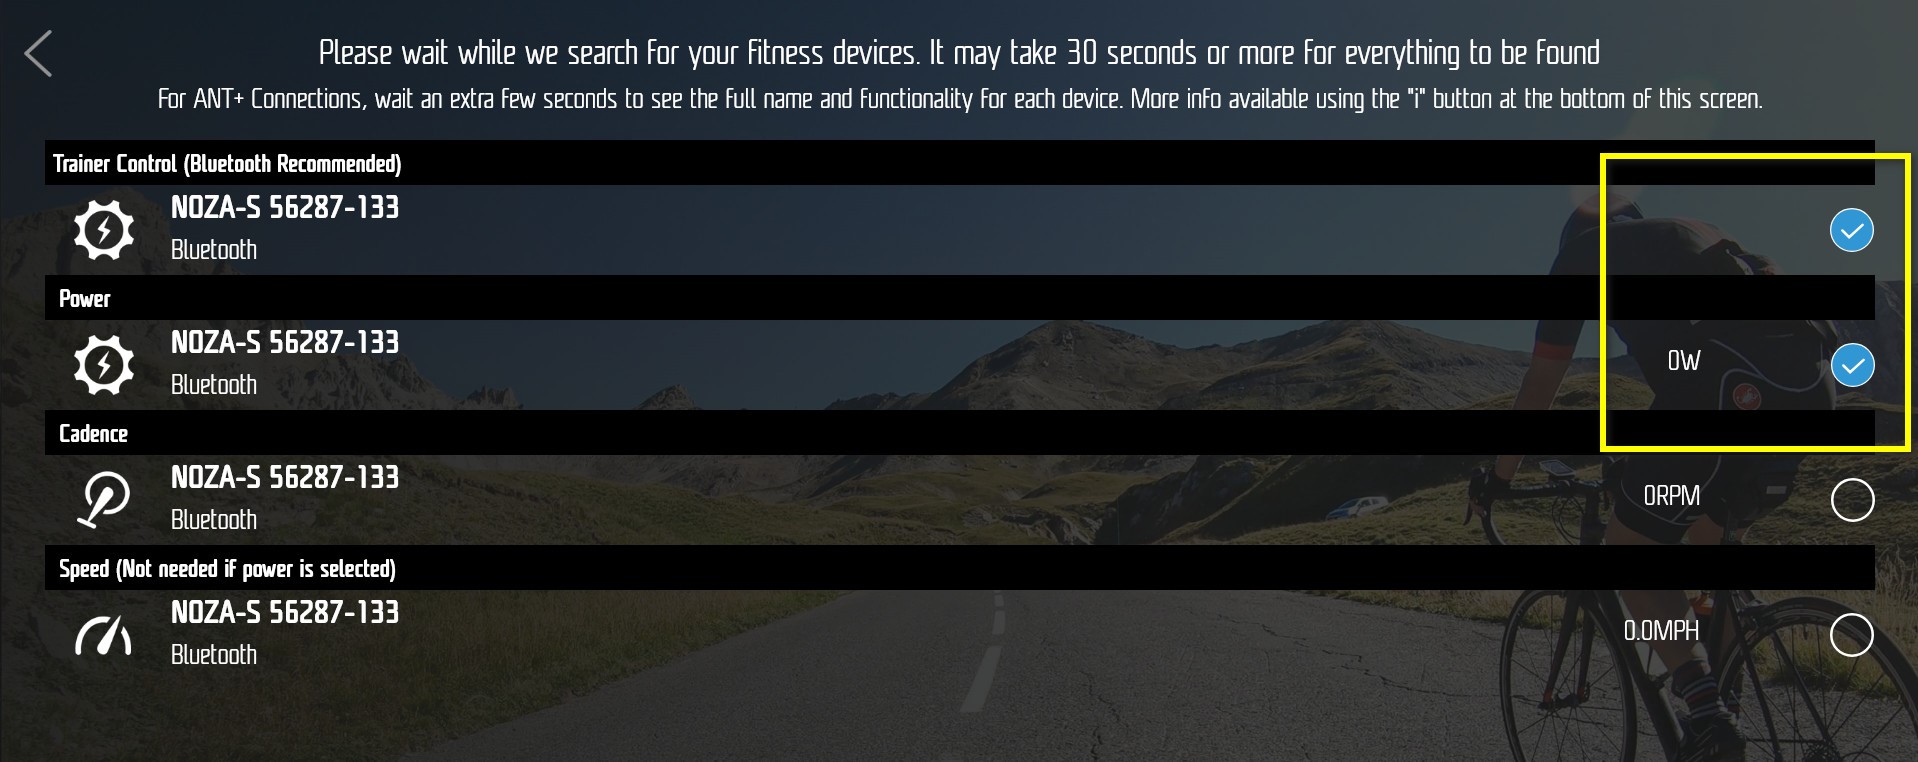
Q: No resistance changes with Noza S and Windows 10 and Win 10 Pro in FulgazYou will need to turn on the "separate power meter support" option then connect your trainer as both the trainer control source and also an external power source when pairing.
First, open your FulGaz app and un-pair your devices from the pairing screen, then continue to the main ride menu. Go into your settings (click the "cog" icon), then scroll down and select Advanced Trainer Settings.
Check the tick-box next to Separate Power Meter Support.
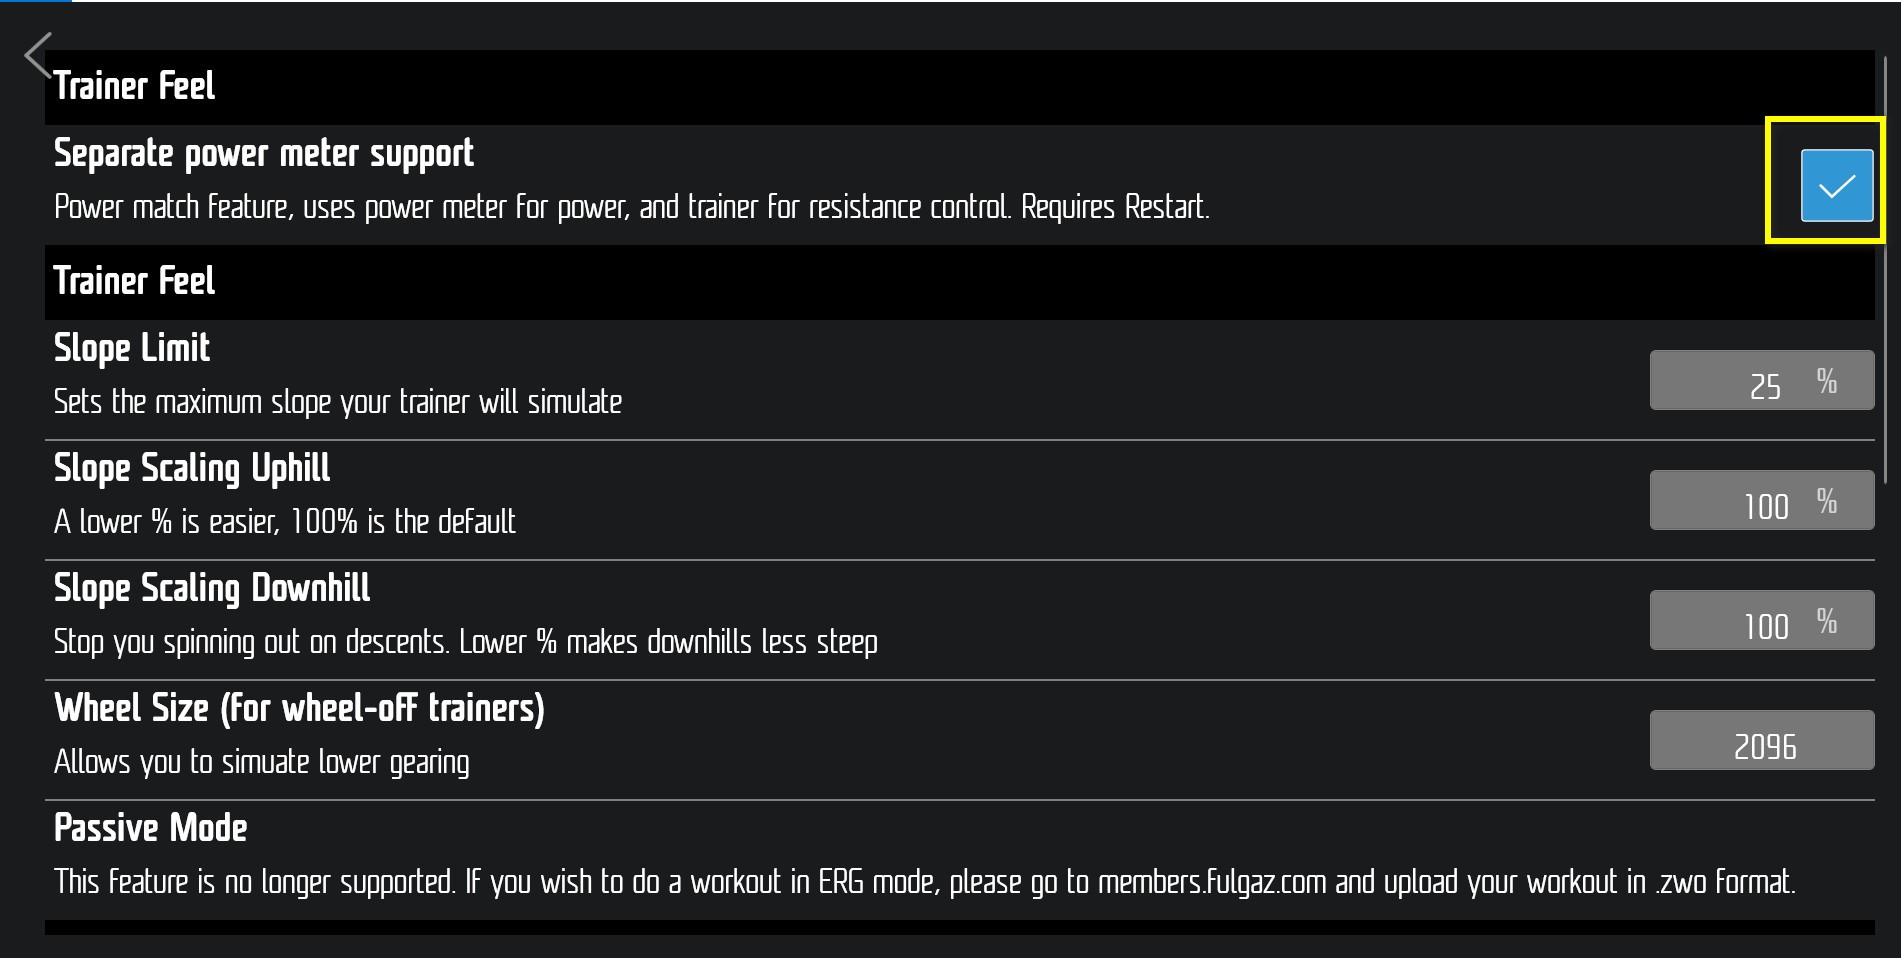
Exit settings shut down and re-start the app. You should then be given new pairing options when you open the app again.
-
Q:KurzanleitungLaden Sie für Anweisungen die vollständige Xplova NOZA S Kurzanleitung als PDF herunter.
A must read notice for the Noza S owners during the installation!
-
Q:Muss der Xplova NOZA S auf Null zurückgesetzt/kalibriert werden?Nein. Der Xplova NOZA S setzt sich automatisch auf Null zurück, wenn er mit einer Stromquelle verbunden ist. Das bedeutet, dass sich der Controller automatisch auf Null zurücksetzt, wenn das Stromkabel des Geräts getrennt und wieder eingesteckt wird. Um Leistungsgenauigkeit sicherzustellen, fahren Sie 10 Sekunden nicht auf dem Gerät, bevor Sie es wieder an eine Stromquelle anschließen.
-
Q:Ist für den Xplova NOZA S ein Spindown erforderlich?Nein. Der Xplova NOZA S nutzt ein automatisches Spindown-System, das automatisch die Spannung des Bands anpasst, damit die mechanische Abnutzung stets gleichmäßig bleibt. Eine leichte Abnutzung des Bands durch lange Nutzung hat keinen Einfluss auf die Mechanik des Geräts, weshalb kein Spindown durchgeführt werden muss.
*Note: We recommend to perform spindown calibration procedure every three-six months, or whenever you feel having an abnormal power accuracy. -
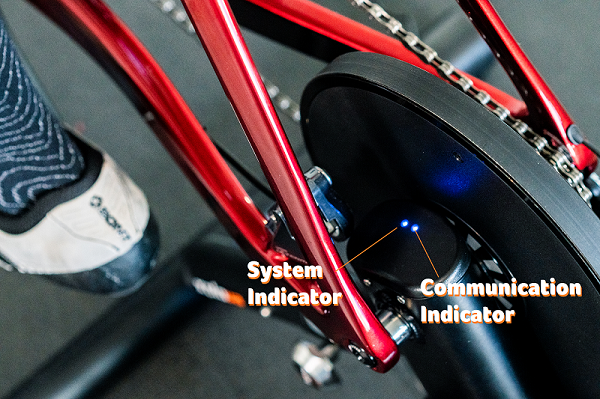
Q:Beschreibungen für die LeuchtanzeigeWenn Sie den Trainer an eine Stromquelle anschließen, wechselt die Leuchtanzeige von Rot zu einem blinkenden Grün. Dieses Lichtsignal bedeutet, dass das Steuerpanel des Trainers einen automatischen Test und eine Zurücksetzung auf Null durchführt. Wenn das Licht grün blinkt, bedeutet dies, dass das Steuerpanel den Test und die Zurücksetzung auf Null abgeschlossen hat. Zu diesem Zeitpunkt befindet sich das Gerät im Stand-by-Modus und kann benutzt werden.
-
Q:Die Leuchtanzeige ist rotDer automatische Test und die Zurücksetzung auf Null des Steuerpanels laufen noch und sind noch nicht abgeschlossen.
*Hinweis:
1. Unter normalen Bedingungen ist dieser Vorgang nach dem Anschließen an eine Stromquelle innerhalb von 2 bis 4 Sekunden abgeschlossen.
2. Verwenden Sie den Trainer zur Sicherstellung von Leistungsgenauigkeit erst, wenn das automatische Zurücksetzen auf Null und der Test abgeschlossen sind.
-
Q:Die Leuchtanzeige blinkt grünDer automatische Test und das Zurücksetzen auf Null sind abgeschlossen. Sie können das Gerät jetzt mit einer Drittanbieter-Simulationssoftware verbinden und wie immer benutzen.
-
Q:Die Leuchtanzeige leuchtet durchgehend grünDies bedeutet, dass das Gerät erfolgreich mit dem Bluetooth-Gerät gekoppelt und verbunden wurde.
-
Q:Die Leuchtanzeige ist blauDer Trainer ist eingeschaltet und an eine Stromquelle angeschlossen.
*Die Leuchtanzeige leuchtet blau, wenn der Benutzer mit dem Trainer fährt und eine Verbindung über Bluetooth oder ANT+ hergestellt hat.
-
Q:Warum ist die Leuchtanzeige aus?Hier sind einige mögliche Gründe, warum die Leuchtanzeige aus ist:
1. Keine Verbindung zu einer Stromquelle:
Prüfen Sie, ob das Stromkabel richtig angeschlossen ist.
2. Schlechte Verbindung zwischen dem Stecker und dem Trainer:
Trennen Sie das Netzteil und verbinden Sie es dann erneut. Wenn das Gerät danach immer noch nicht ordnungsgemäß funktioniert, wenden Sie sich an Ihren Händler, um den Stecker oder das Netzteil auszutauschen.
3. Fehlerhaftes Netzteil:
Prüfen Sie, ob die Leuchtanzeige am Netzteil leuchtet. Wenn nicht, tauschen Sie das Netzteil aus. Lesen Sie das Handbuch, um die Spezifikationen des Netzteils für diesen Trainer zu erfahren. Die Nutzung eines Netzteils mit anderen Spezifikationen für diesen Trainer ist untersagt.
4. Wenn das Problem durch die oben genannten Vorschläge nicht gelöst werden kann, wenden Sie sich an Ihren ursprünglichen Händler bzw. Ihr Service-Center für weitere Unterstützung.
-
Q:Warum besteht eine erhebliche Leistungsabweichung?Fehler beim Zurücksetzen auf Null:
Setzen Sie den Trainer auf Null zurück, indem Sie ihn von der Stromquelle trennen, 20 Sekunden warten und ihn dann wieder anschließen. Sie dürfen die Pedale und das Gerät mindestens 10 Sekunden vor dem erneuten Anschließen nicht bewegen.
-
Q:Ich kann keine Bluetooth-Verbindung herstellen. Warum?Hier sind einige mögliche Gründe, warum Sie keine Bluetooth-Verbindung herstellen können:
1. Keine Verbindung zu einer Stromquelle: Prüfen Sie, ob das Stromkabel ordnungsgemäß angeschlossen ist und das Lichtsignal normal ist.
2. Bluetooth ist auf Ihrem Drittanbieter-Simulationsgerät deaktiviert: Prüfen Sie, ob Bluetooth auf Ihrem Telefon oder Computer aktiviert ist.
3. Wenn das Problem durch die oben genannten Vorschläge nicht gelöst werden kann, wenden Sie sich an Ihren ursprünglichen Händler bzw. Ihr Service-Center für weitere Unterstützung.
-
Q:Why can't I find the Bluetooth signal in my mobile device?*You must download Xplova Workout App and other compatible training/fitness APP to find the Bluetooth signal in order to pair with the Noza S and start the training session.
To connect the Noza S with Xplova Workout app, you must enable the Bluetooth and GPS function in your smartphone settings.
1. Check on the Noza S indicators, the blinking blue light means the communication is paired.
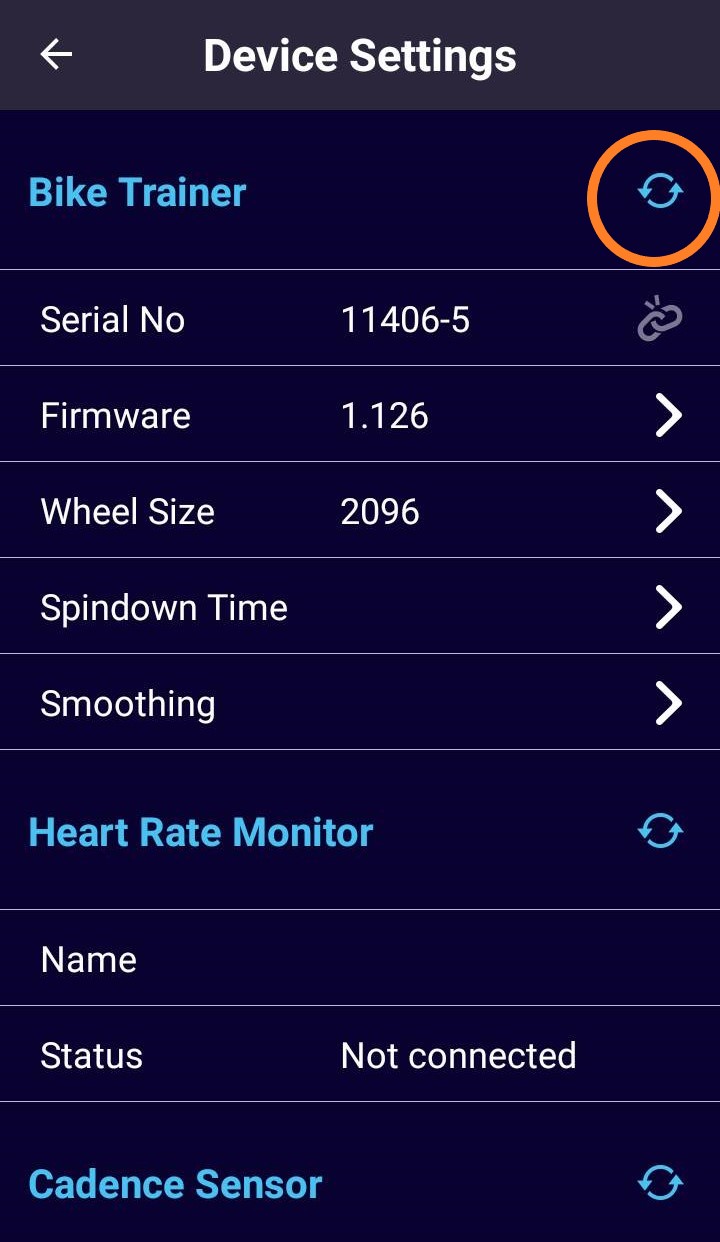
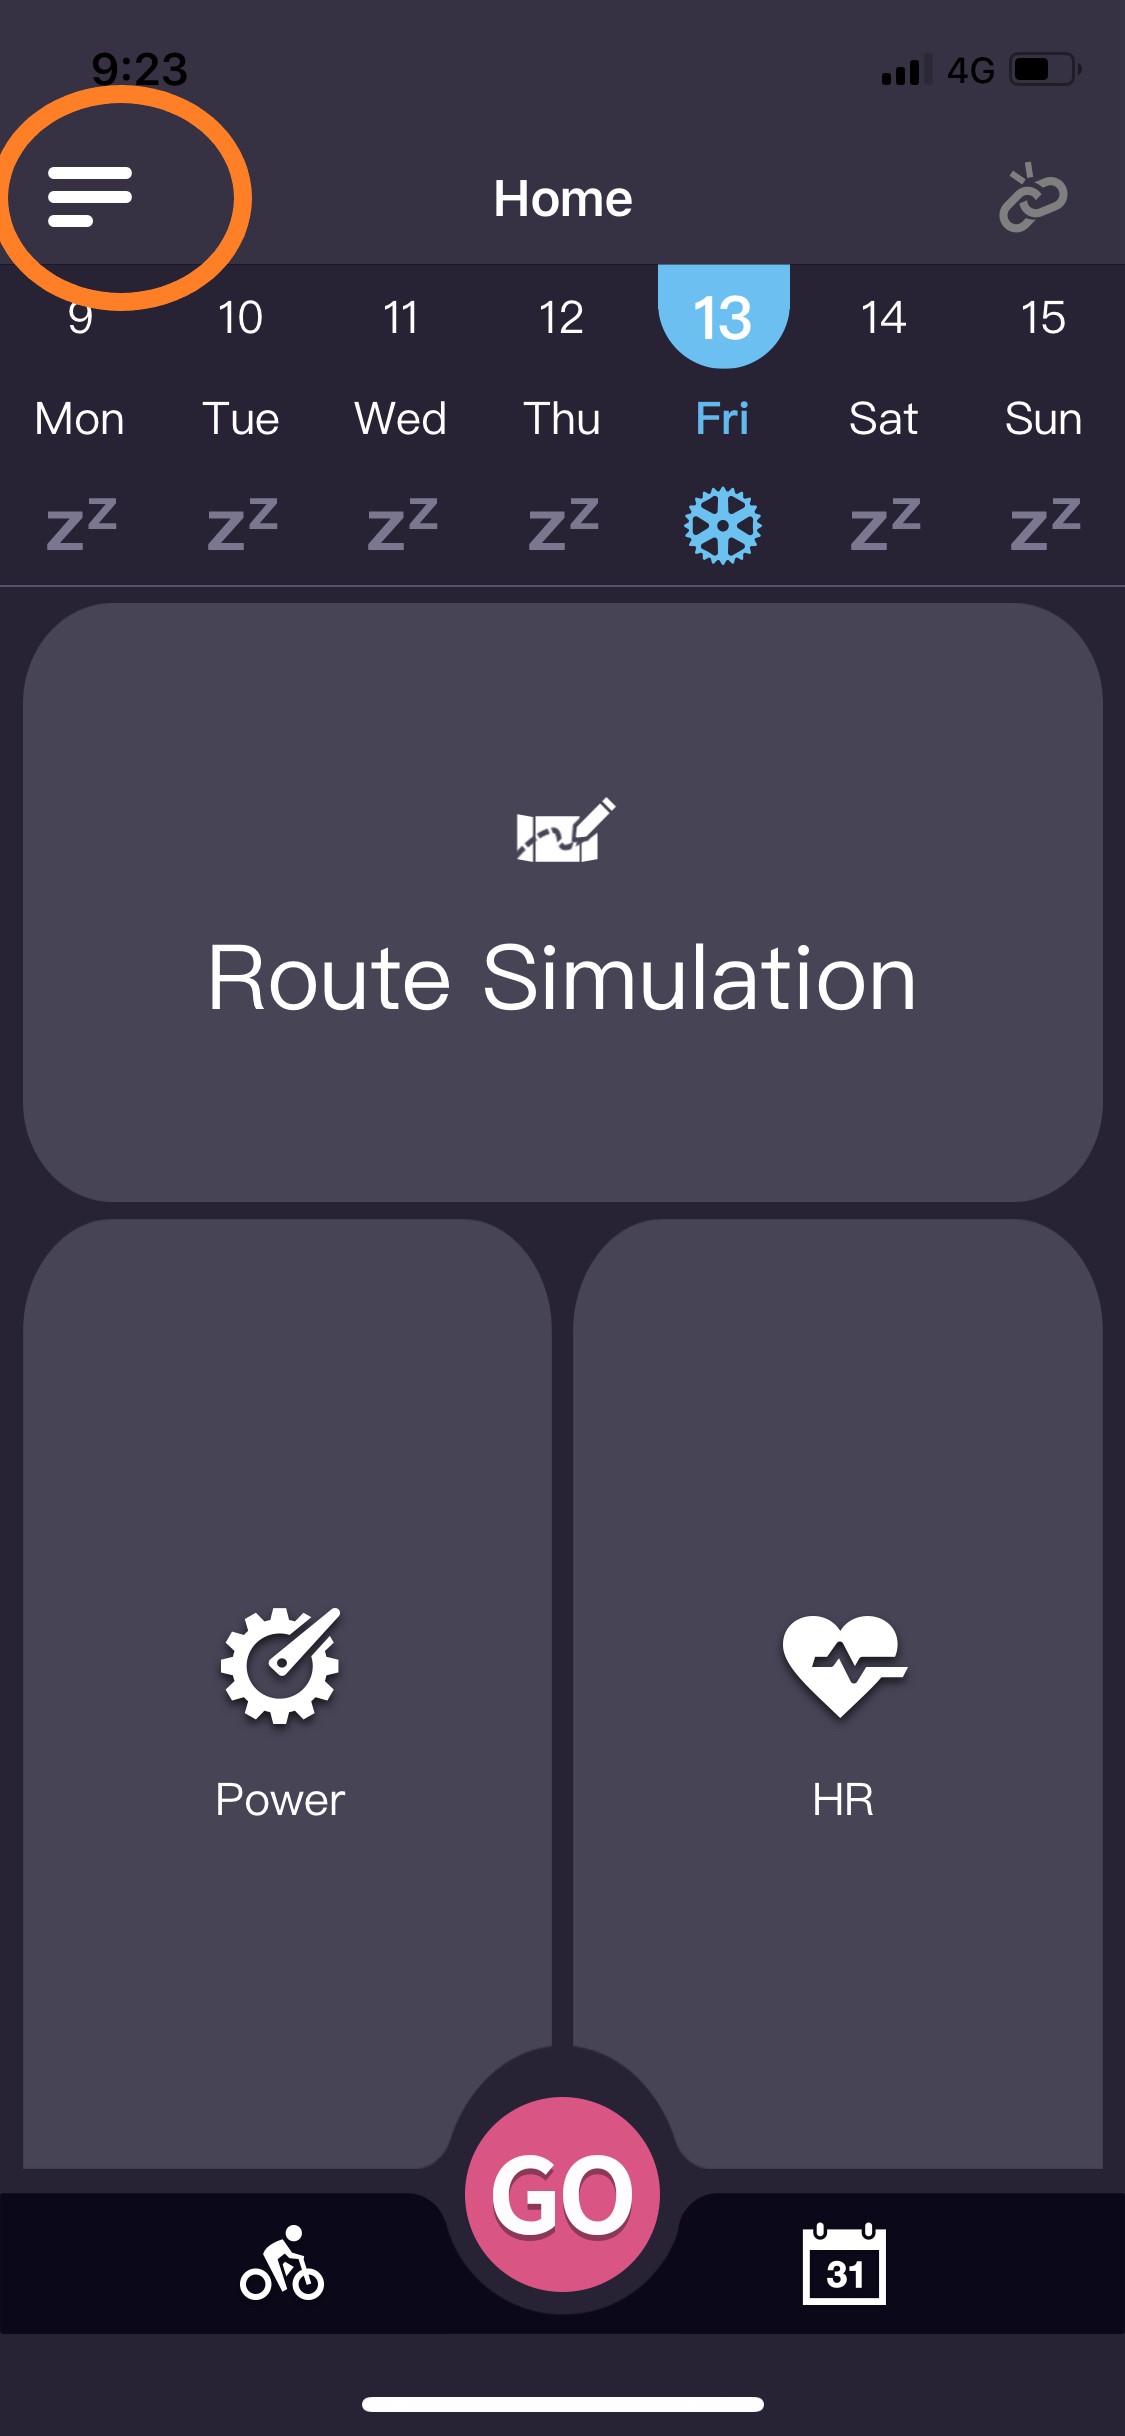
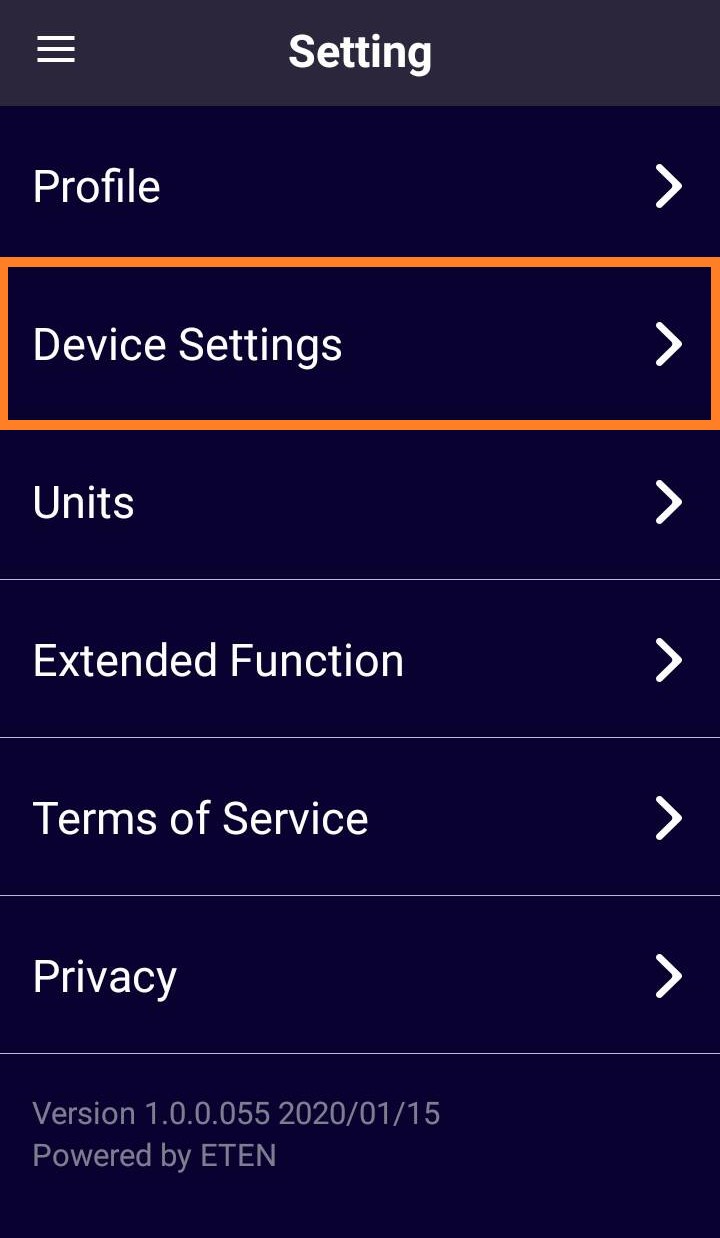
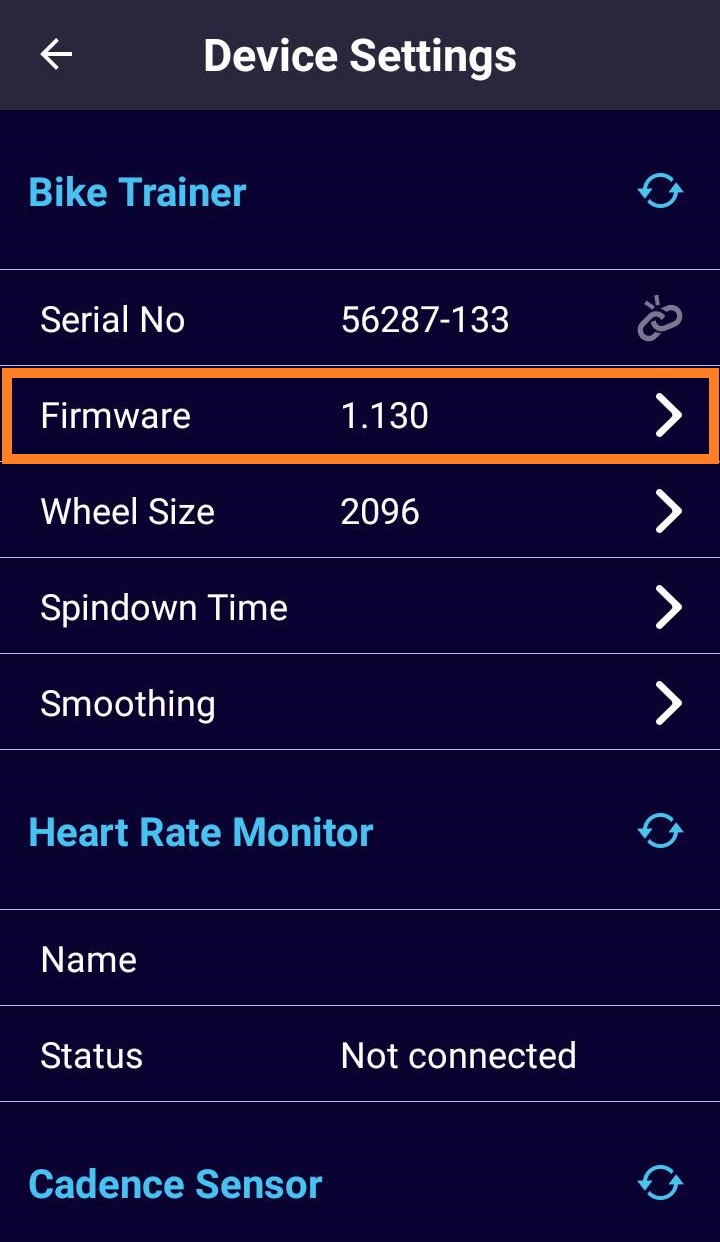
2. Go to Xplova Workout APP→Menu→Setting→Device Setting.
3. Click on the search icon by Bike Trainer → you will see the nearby Noza S available for connection (Ex: NOZA-N/S XXXXX)


-
Q:Die Verbindung funktioniert, aber warum wirkt die Leistung niedrig?Hier sind einige mögliche Gründe, warum die Verbindung funktioniert, aber die Leistung niedrig wirkt:
1. Fehler beim Zurücksetzen auf Null:
Setzen Sie den Trainer auf Null zurück, indem Sie ihn von der Stromquelle trennen, 20 Sekunden warten und ihn dann wieder anschließen. Sie dürfen die Pedale und das Gerät mindestens 10 Sekunden vor dem erneuten Anschließen nicht bewegen.
2. Wenn das Problem durch die oben genannten Vorschläge nicht gelöst werden kann, wenden Sie sich an Ihren ursprünglichen Händler bzw. Ihr Service-Center für weitere Unterstützung.
-
Q:The power and speed seems to be on the low side, no sign of moving up?Self-diagnosis Solution 2:
Step 1: Go to Xplova Workout APP
Step 2: Pair with Noza S
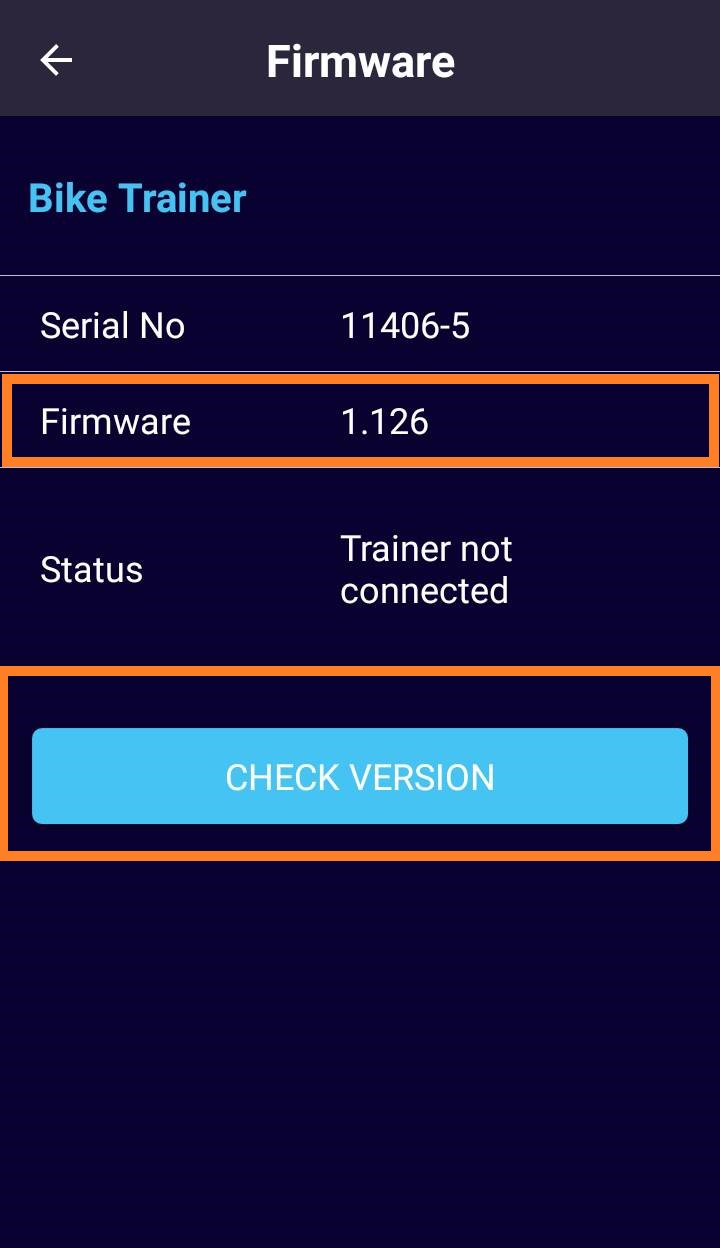
Step 3: Make sure you have the latest firmware updates (view under workout app)
Step 4: Go riding under ERG mode, test ride for a minute and observe the watts output.
Upgrade to the latest firmware will solve this problem. If none of the above solves the problem, please contact our original dealer or service centre for assistance.


-
Q:How to tighten the cassette body?The cassette washer must be manually twisted in to about 3 teeths, and then use the socket wrench to tighten it
Please see video guide here. https://youtu.be/_ko2y_lxUxE -
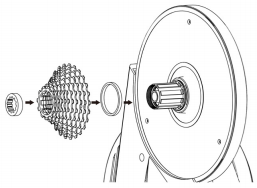
Q:How to install the cassette body?1. When the cassette body is installed onto the large pulley, you can gently press the ratchet pawl with a small object. At the same time, rotate the ratchet seat counterclockwise as demonstrated in the video.
2. After locking the end cap, turn the cassette body clockwise until you cannot turn to move. When you turn counterclockwise, it can be easily rotated to release. There should be no space when pulling the cassette body axially.
Please see the video guide, https://youtu.be/CuCH9WHU2n0 -
Q:How to replace the adapter A to adapter C for thru axle with cassette nut?When replacing the adapter C with the cassette nut, there is no need to pull off the cassette body after removing the original adaptor A. Simply replace the adapter C with the cassette nut.
Please see the video guide https://youtu.be/0FR47Fjucbs -
Q:Why is the power meter inaccurate compared to NOZA S?1. Please make sure the calibration tool is provided by the original power meter manufacturer and the power meter has been calibrated properly.
2. If possible, use another power meter as a reference source in order to compare the accuracy of the current power meter.
3. Check the installation again according to the NOZA S Quick Service Guide, including all fixing screws, and confirm that the installation and locking are completed according to the specifications.
4. Ensure the NOZA S has done the spindown calibration. 5. Before each power value comparison, please warm up the NOZA S by riding it for 10 minutes and then perform the reading comparison.
6. Please use the average power data of 30mins riding as the power value comparison between NOZA S and power meter.
-
2020.05.26Noza S Patch Release NoteFor supporting the firmware 1.134 version update for Android & iOS users.
This quick-guide is to help consumers perform a self-update to the NOZA S when they see a firmware version 0.100 in the Xplova Workout App.


Workout app NOZA S Patch app
Scan QR code to download Android app Scan QR code to download iOS app


View video tutorial (Android)
View video tutorial (iOS)
-
2020.04.06NOZA S Firmware Release NoteAndroid and IOS version 1.134
1. Free ride & ERG mode improvements under ZWIFT
2. Optimized speed calculation
*Once your Noza S is paired and connected to the Workout APP, please update to the latest version. Please ensure your smartphone stays connected during the update!
-
2020.03.18NOZA S Firmware Release NoteAndroid and IOS version 1.130
1. Road feel & ERG mode improvement under ZWIFT
2. Free ride mode improvement under ZWIFT
*Once pair and connect your Noza S with Workout APP, please update to the latest version. Please ensure your smartphone stay connected during update!
-
2019.12.30Xplova Workout App UpdateAndroid 1.0.0.055/ IOS 1.18 (1)
1) Adjust calender display on date/week issue
2) Fix the compatibility with android 9.x
3) Fix the compatibility with IOS 13.x
-
2019.12Xplova Workout App UpdateAndroid 1.0.0.054
1) Add ERG mode smoothing switch function.
2) Update Google map SDK Version.
IOS 1.14(2)
1) Add ERG Mode Smoothing switch function.
2) Update SDK.
3) Improve readability under dark appearance option
-
2019.12NOZA S Firmware Release NoteNOZA S Firmware Release Note
Android and IOS version 1.126
1. Updated power algorithms
-
2019.11NOZA S Firmware Release NoteAndroid and IOS version 1.125
1. ZWIFT BLE connection problem improvement
2. Power accuracy improvement
3. Road feel improvement in free ride mode under ZWIFT
-
2019.10NOZA S Firmware-VersionshinweiseAndroid 1.0.0.50 und iOS 1.11.1
1. Neues Workout-App-Symbol
2. Optimierung des Steigungsbereichs auf 25.
3. Update für neues Modell
Neues Logo-Design
* Speziell für Noza S
1) Anpassung an die Seriennummer-Regelung
2) Optimierung der Spindown-Verarbeitungszeit
-
Android 1.0.0.045/iOS 1.8(1) Versionshinweise1. Wechsel zwischen imperialen und metrischen Maßeinheiten
2. Funktion zur Anzeige von Drittanbieter-App-Feedback bei aktiver Kopplung
3. Optimierung der Benutzeroberfläche zur Verbindung mit dem Noza Smart Trainer
Optimierung des Trainingsmodus für Steigung/Gefälle
Optimierung des Widerstands-Simulationsmodus
4. Kalibrierung der Synchronisation mit der iPhone SE-/iPhone 5 Benutzeroberfläche
5. Fehlerbehebungen
-
Android 1.0.0.031 /iOS 1.5(12) Release Notes1. Add Route simulator function.
2. Add load mode control in free ride.
3. Support BLE HR & BLE Cadence Sensor.
4. Increase several power adjustment function in training mode.
5. Improve BLE devices connection.
6. Bug fix.
-
NOZA S Firmware BT204.1.4.02 Release Note● Before updating firmware, please make sure your Xplova Workout App is the latest version.
● Make sure Xplova Workout App is connected to Internet.
● Make sure Workout App is paired with NOZA S.


● Troubleshooting
NOZA S will reset automatically after receiving firmware update. If it cannot be connected after firmware update, users can simply unplug then plug in the device again to solve this issue.
-
NOZA S BT204.1.4.03 Release Note● Stability improvements