-
Q:How do I adjust the time set in the X5's GPS module?The GPS module will automatically fetch the time from the satellite signals and thus you don't need to change it. It will auto-adjust the time once it acquires GPS signals from three of the (3D) satellites.
-
Q:How do I register my X5?You can sign up new account at www.xplova.com or download Moment App to register
-
Q: Why does the X5 fail to retrieve GPS location?First, allow the unit to reacquire GPS satellite signal. If the unit is still unable to fix your current position, it is recommended to check if there are tall obstructions around you, such as elevated roads, high-rise buildings, and the like. Or you can reset the GPS receiver and find your position again in an open area.
-
Q: How do I connect it to peripheral devices?1. Go to [Settings] > [Wireless Sensors] > [Heart Rate Belt] or (Bike Name)* to see other sensors (Speed/Cadence/Combo/Power Meter).
2. Click Search Again.
3. Please power on or wake up the wireless sensors. Sensor IDs will shortly appear on your screen.
4. Click on the desired ID and wait for the current connected device to display a number.
5. Go back to the previous menu. You will see the corresponding number of the sensor once the connection is confirmed.
6. Start your workout. The sensor values will change based on your physical condition. -
Q: How do I remove the peripheral sensors (e.g. heart rate belts)?1. Enter the wireless sensor options. You will see an ID number displayed under the current connected device.
2. Press and hold the number to remove the pairing. -
Q:No Internet access after connecting to 3G.1. Go to the Internet connection settings to confirm that the carrier is correct. If no carrier is found, you can assign one manually.
2. Verify that the Access Point Name (APN) is correct. -
Q:How do I do Group Rides?1.Please switch to the navigation mode, and enter the Quick Menu, then [Navigation Mode Settings] > [Group Ride].
2.You can create or join Group Rides there. -
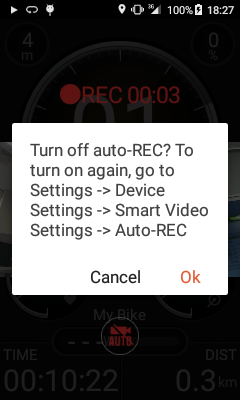
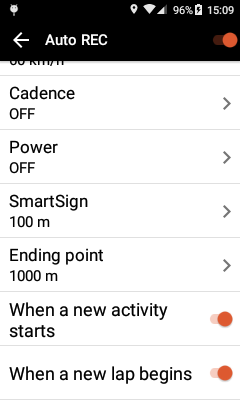
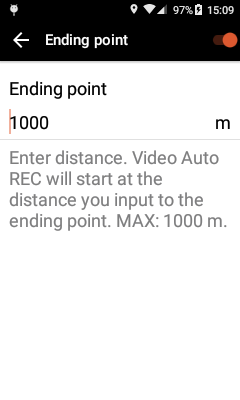
Q:How do I enable smart video recording?Go to the Quick Menu> [Device Settings] > [Smart Video Settings] > [Auto REC], and specify the conditions you wish to shoot under.
-
Q:How do I adjust the length of the video?Go to the Quick Menu> [Device Settings] > [Smart Video Settings] > [Recording Duration] to adjust to 3, 6 or 9 seconds.
-
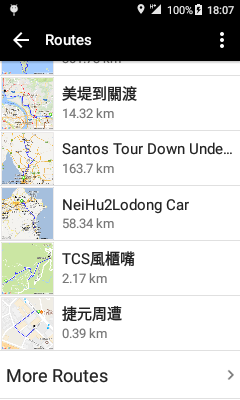
Q: How do I plan a new route?Please log in to www.xplova.com, and then select [Routes] > [Plan Routes].
-
Q:How do I update the software?Once connected to wi-fi, go to Quick Menu > Settings > System Settings > About. Select "CHECK THE LATEST UPDATE" to download and install software updates automatically.
-
Q:How do I change the display from kilometers to miles?Go to [System Settings] > [Units] and change from the Metric system to the Statute system.
-
Q:How do I adjust the backlight timeout? What are the options? How do I turn on auto brightness?1. Go to [System Settings] > [Display] > [Backlight On] to specify a duration for the backlight.
2. The five backlight on options include: 15 s, 30 s, 1 min, 2 mins, and Always.
3. Select [Display] > [Brightness], and turn on [Auto-Brightness] (the default setting is on.) -
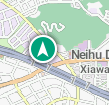
Q:How do I find Smart Signs?Go to [Profile] > [Routes] > Select a Route marked with Smart-Sign (the quantity and information of your points of interest are also shown) > [Ride This Route] > Press the [Up] key to toggle and bring up the Smart-Sign menu. Click on the Smart-Sign markers to learn more about the places and their positions on the route.
-
Q:How do I find the Altitude Chart?After selecting a bike route, press [Ride This Route] > Down key to toggle and bring up the Altitude Chart, where you can zoom in/out for detail changes on the terrain.
-
Q:Wi-fi signals are weak.Please enter [Internet Connections], [Wi-Fi Settings] again, and choose a higher-speed wireless network from the selection menu below.
-
Q: When should I do Altitude Calibration?The X5 measures altitude using a barometric altimeter, which is highly sensitive to changes in air pressure and temperature. To ensure the accuracy of the altimeter under changing weather conditions, it is better to manually set the altitude instead of auto adjusting by GPS. Please find a location with a known altitude, or make a query in Google Maps/Earth and place the X5 at the location. Enter the Quick Menu > [Altitude Calibration] > [Disable Auto Calibration] > [Select Altitude], and press the pen icon at the upper right corner to edit the altitude reference point. Up to three points can be chosen for quick altitude correction.
-
Q:How do I upload video?Go to Quick Menu > [Profile] > [Activities] and select the wanted activity record while Internet connected. If you have recorded a video, from the bottom of the list, select [Create Video] and the unit will prompt you to generate, preview and upload the video to the Cloud. Once completed, a "video" icon will show after the name of the recording.
-
Q:How do I share a video on Facebook?Once you have uploaded a video to the Cloud, roll down to the bottom of the selected Activity Details, and it will show the completed live video. Click on […] on the lower right of the video > [Share] > [Facebook], and log in to Facebook to share your live broadcast.
-
Q:How many three-second video clips can the X5 take?If the X5 is pre-loaded only with the map of Taiwan, more than five hundred 3-second videos may be taken.
-
Q:Can the X5 shoot for extended periods of time?The X5 has a built-in camera that features 3/6/9 second video recording, and thus provides users with different shooting options.
-
Q:X5 accessories (standalone)Includes the main unit, a bike mount , a USB cable, and related user manuals.
-
Q:Does the X5 require a SIM card for the 3G Internet connection?Yes, you need a SIM card to access a 3G network. The X5 has a built-in Micro SIM card slot. (Please do not use Nano SIM cards.)
-
Q:What if the 3G connection disappears? Will the X5 keep the records?Though the X5 disconnects from the Internet, the system will keep sending connection requests on a regular basis. So as soon as it reacquires a 3G signal, it will upload your videos as usual.
-
Q: Is the charging cable of the X5 identical to that of a cellphone?Yes, any standard Micro USB cable for Android devices will work.
-
Q:Do the Xplova products, such as the Heart Rate Strap and 2-in-1 Combo Sensors, connect to other competing products?Yes, they are compatible with all ANT+ wireless-enabled sensors.
-
Q:Are detailed specifications of the X5 available?Yes. For details, please see Xplova's official website at www.xplova.com
-
Q:What is the difference between the X5's OSM and Google Maps?They belong to different map system, and both give clear guidance on bike routes. OSM Maps can providing maps of detailed cycling routes and mountain trails.
-
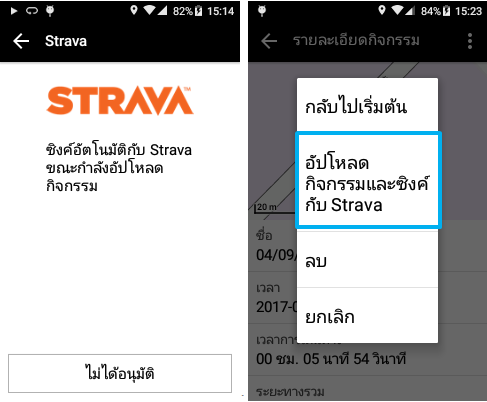
Q:How to sync your X5 activities with Strava?1.Yes, you can upload a record of every completed ride to Strava via the Xplova website.
2.Please apply for a Strava account.
3.Please refer this link to check the sync to Strava process: Sync STRAVA -
Q:What built-in languages does the X5 have?The X5 currently supports Traditional Chinese, English, German, Italian. (support for more languages is planned for the future).
-
Q: Can I share videos from the X5 to Facebook?Yes, You can sharing on Facebook.
-
Q:Is there a charge for the X5's map downloads?The OSMs for the X5 are currently free; all customers are welcome to download them.
-
Q:Can other software be installed on the X5?No. This is in order to prevent other software from causing the device to crash.
-
Q:Can I change the background color to black or white?Yes, the background can be manually changed to suit your preferences (but if the system is set to auto-adjust, it will display white during daylight hours, and change to black at around 6 pm).
-
Q:Are there offline maps available for the X5?Yes, the OSMs Map can be downloaded and used offline.
-
Q:Does X5 have NFC transmission capability?No. Because NFC only works over a limited distance, the unit does not include this feature.
-
Q:Can I join the same Group Ride by using either the X5 or the Moment app?Yes.
-
2017.12บันทึกการเปลี่ยนแปลงX5 RC181. เปลี่ยนเส้นทาง: คุณสามารถเปลี่ยนไปเส้นทางอื่นได้ขณะบันทึก และบันทึกต่อไปโดยใช้บันทึกเดิม! ขณะบันทึก ให้เลือกเส้นทางที่คุณต้องการเปลี่ยน หลังจากยืนยันเส้นทาง X5 จะแสดงหน้าต่างกล่องข้อความแบบป๊อปอัพถามว่าคุณต้องการละทิ้งบันทึกนี้หรือไม่ เลือก "ดำเนินการต่อ” ในตอนนี้เพื่อเปลี่ยนเส้นทาง และดำเนินการต่อกับการบันทึกเดิม.
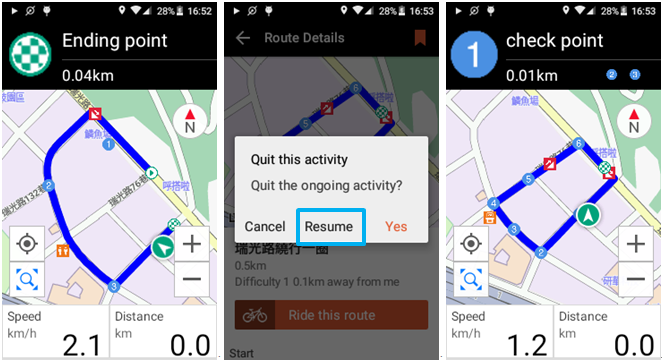
*สามารถทำแบบเดียวกันนี้ได้ในเส้นทางกิจกรรม คุณสามารถเปลี่ยนไปยังกิจกรรมอื่นเพื่อเปลี่ยนไปใช้เส้นทางที่คุณต้องการเพื่อทำการบันทึกต่อไป.
*หากการบันทึกเริ่มขึ้นก่อนการโหลดเส้นทาง คุณยังสามารถเลือกเส้นทาง แล้วแตะ "ดำเนินการต่อ” เมื่อมีการเตือนให้ดำเนินการบันทึกต่อไป.
*อัตราการเสร็จสิ้นในการจัดลำดับจะถูกคำนวณโดยอิงกับเส้นทางสุดท้ายที่มีการโหลดในบันทึก.
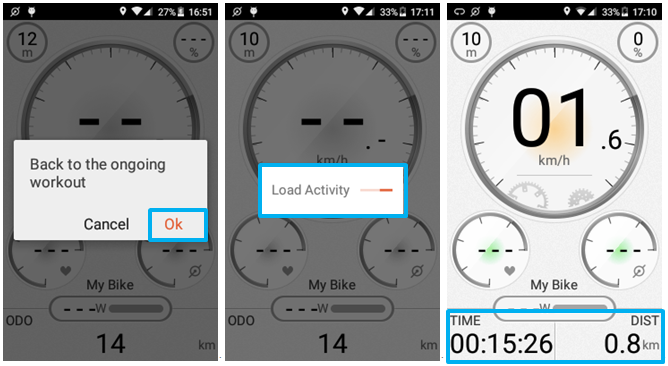
2. บันทึกต่อ: ขณะบันทึก หากคุณกดปุ่มเปิด/ปิดค้างไว้เพื่อบังคับให้ X5 ปิดการทำงาน หรือเครื่องปิดการทำงานเนื่องจากระดับแบตเตอรี่ต่ำ จะปรากฏกล่องข้อความแบบป๊อปอัพในครั้งต่อไปที่ X5 ถูกเปิดเครื่อง ข้อความจะถามว่าคุณต้องการกลับสู่การออกกำลังกายที่ดำเนินอยู่หรือไม่ แตะ "ตกลง” เพื่อบันทึกต่อไปด้วยการบันทึกครั้งล่าสุดของคุณ เมื่อหยุดพักระหว่างการเดินทางไกล คุณสามารถปิดเครื่องและชาร์จ X5 ได้ หลังจากการพัก เพียงเปิดเครื่อง X5 ก็พร้อมใช้งานต่อ X5 จะดำเนินการบันทึกต่อไปโดยใช้การบันทึกเดียวกัน!
*หมายเหตุสำคัญ: หลังจากรีบูต หากคุณเลือก "ยกเลิก" เมื่อปรากฏกล่องข้อความ ข้อมูลจากครั้งก่อนที่ยังไม่บันทึกจะถูกลบทิ้ง ในการบันทึกข้อมูลครั้งก่อน โปรดเลือก "ตกลง" เมื่อปรากฏหน้าต่างป๊อปอัปหลังจากรีบูต แล้วสิ้นสุดการบันทึกด้วยตัวเอง.
3. เพิ่มปุ่มควบคุมกายภาพให้กับหน้าต่างกล่องข้อความ: ตอนนี้คุณสามารถใช้ปุ่มกายภาพแทนการควบคุมด้วยระบบสัมผัสเมื่อปรากฏกล่องข้อความขึ้นระหว่างการฝึกซ้อม.
*สามารถจัดเรียงตัวเลือกข้อความได้ 3 รูปแบบ:
a.จัดเรียงซ้าย/ขวา: กดปุ่มโหมดที่ด้านซ้ายของ X5 เพื่อเลือกตัวเลือกที่ด้านซ้าย กดปุ่มลงที่ด้านขวาของเครื่องเพื่อเลือกตัวเลือกที่ด้านขวา.
b.จัดเรียงบน/ล่าง: ใช้ปุ่มขึ้นที่ด้านขวาของ X5 เพื่อเลือกตัวเลือกด้านบน ใช้ปุ่มลงเพื่อเลือกตัวเลือกที่ด้านล่าง.
c.จัดเรียงซ้าย/กลาง/ขวา: กดปุ่มโหมดที่ด้านซ้ายของ X5 เพื่อเลือกตัวเลือกด้านซ้าย กดปุ่ม REC (บันทึก) เพื่อเลือกตัวเลือกตรงกลาง กดปุ่มลงที่ด้านขวาของเครื่องเพื่อเลือกตัวเลือกที่ด้านขวา.
4. การดาวน์โหลด Smart Map: เมื่อคุณเปิดข้อมูลเส้นทางสำหรับการขี่หรือการแข่งที่ไม่ใช่ในพื้นที่ของคุณ หรือการขี่ในเส้นทางที่ไม่คุ้นเคย ระบบจะค้นหาว่าโหลดแผนที่ในเส้นทางนี้แล้วหรือไม่ หากยัง คุณสามารถดาวน์โหลดข้อมูลแผนที่ที่จำเป็นสำหรับสถานที่ดังกล่าวด้วยการแตะเพียงไม่กี่ครั้ง!
5. เครื่องหมายรอบ: ตอนนี้ X5 สามารถเพิ่มข้อมูลเครื่องหมายรอบ/ช่วงบนแผนที่ที่บันทึกรายละเอียดสรุป คุณสามารถดูเวลาช่วงได้โดยตรงบน X5 หลังสิ้นสุดการบันทึก!
*จะแสดงเครื่องหมายช่วงเวลาบนแผนที่ตามลำดับ คือ 1, 2, 3…9 -> 0, 1, 2, 3...9 -> 0, 1, 2, 3...
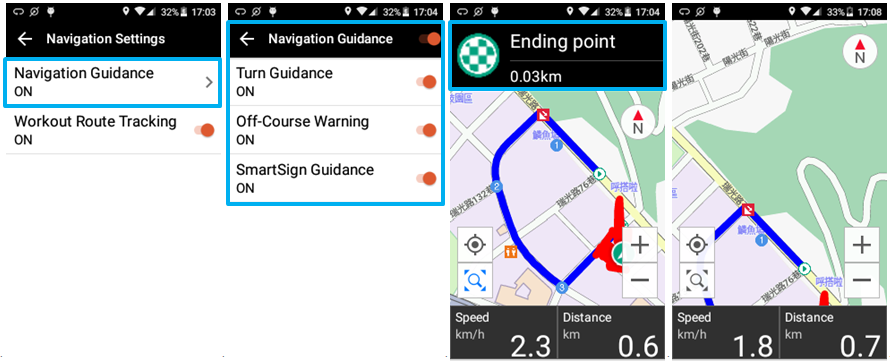
6. ฟังก์ชันการแจ้งเตือนการนำทางขั้นสูง: เมื่อขี่ไปตามเส้นทาง คุณสามารถปรับการตั้งค่าการแจ้งเตือนการนำทางสำหรับเส้นทางดังกล่าวได้ นอกจากจะสามารถปิดใช้งานการติดตามกิจกรรมในปัจจุบันแล้ว คุณยังสามารถเปิดใช้งาน หรือ ปิดใช้งานการแจ้งเตือนการนำทางแต่ละรายการ(คำแนะนำการเลี้ยว/คำเตือนการวิ่งนอกเส้นทาง/ระบบนำทาง SmartSign)!
7. ปรับตำแหน่งปุ่ม "การจัดตำแหน่ง": เมื่อโหมดเข็มทิศอยู่ในโหมด "ไปด้านหน้า" ปุ่ม "การจัดตำแหน่ง" จะปรับตำแหน่งลงเอง เพื่อให้มุมมองข้อมูลเส้นทางนั้นดียิ่งขึ้นสำหรับเส้นทางและสภาวะข้างหน้า.
8. แผนภูมิความสูงและเวลาการรีเฟรชตำแหน่งรายการ SmartSign ถูกปรับเป็น 10 วินาที ช่วยให้ประมวลผลสภาวะระหว่างเส้นทางปัจจุบันและ SmartSigns ที่เพิ่งผ่านไป/ที่กำลังจะมาถึง ได้เร็วยิ่งขึ้น.
9. การตั้งค่าการเตือนที่ถูกปรับ: เมื่อเป็นไปตามเงื่อนไขการแจ้งเตือนระหว่างการบันทึก X5 จะแสดงข้อความเตือน ข้อความจะหายไปโดยอัตโนมัติหลังจาก 3 วินาที หากมีการแจ้งเตือนหลายๆ การแจ้งเตือนเกิดต่อเนื่องกัน X5 จะแสดงเฉพาะข้อความเตือนใหม่หลังจาก 10 วินาทีแล้ว ซึ่งหมายความว่าหน้าจอหลักจะไม่เต็มไปด้วยข้อความเตือนที่ต่อเนื่องกัน!
10. เพิ่มเกณฑ์ระยะในการตั้งค่าการเตือน: ตอนนี้คุณสามารถตั้งให้การเตือนนั้นแจ้งเตือนเมื่ออัตราการเต้นของหัวใจ/ความเร็ว/รอบขา/พลังงาน เกินช่วงที่คุณตั้งไว้ ช่วยคุณในการติดตามสภาวะและทำการเตือนหากเป้าหมายการออกกำลังกายเกินช่วงที่ตั้งไว้!
11. ระยะทางที่เดินทางทั้งหมด: ตอนนี้คุณสามารถปรับแต่งระยะการเดินทางสะสมทั้งหมดในจักรยานของคุณ ปั่นสู่เป้าหมายถัดไป!
12. ตอนนี้สามารถอัปโหลดสรุปกิจกรรมได้ในช่วงเวลาที่สั้นลงในระดับชั่วโมง หรือสั้นกว่านั้น.
13. โปรดปิดใช้งานฟังก์ชัน GPS เมื่อใช้อุปกรณ์เทรนเนอร์ในร่ม นี่จะเป็นการล้างข้อมูลตำแหน่ง GPS.
14. เมื่อเซนเซอร์ความเร็วแสดงค่าความเร็วที่ผิดปกติ X5 จะเปลี่ยนเป็นความเร็ว GPS โดยอัตโนมัติ.
15. วิธีคำนวณความยาวอุโมงค์สะสมที่ได้รับการแก้ไข ตอนนี้ความยาวอุโมงค์จะถูกคำนวณจากระยะทางแบบเส้นตรงระหว่างปลายทั้ง 2 ด้านของอุโมงค์ และเพิ่มในการบันทึกหลังจากที่ลอดผ่านอุโมงค์มาแล้ว.
16. ขณะนี้ TSS/IF จะแสดงจุดทศนิยม 2 ตำแหน่งเพื่อความเที่ยงตรงที่เพิ่มขึ้น.
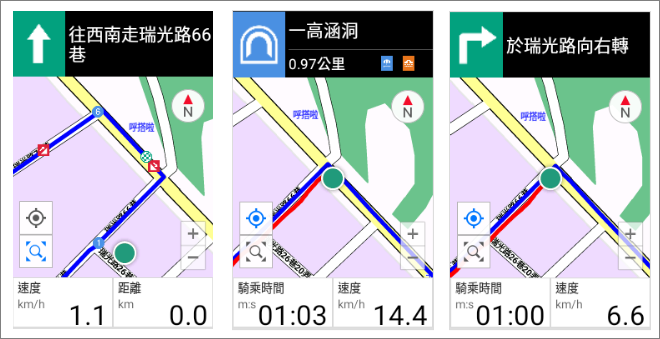
17. ระยะทางการแจ้งเตือนของคำแนะนำการเลี้ยวได้ปรับเป็น 100 เมตร.
-
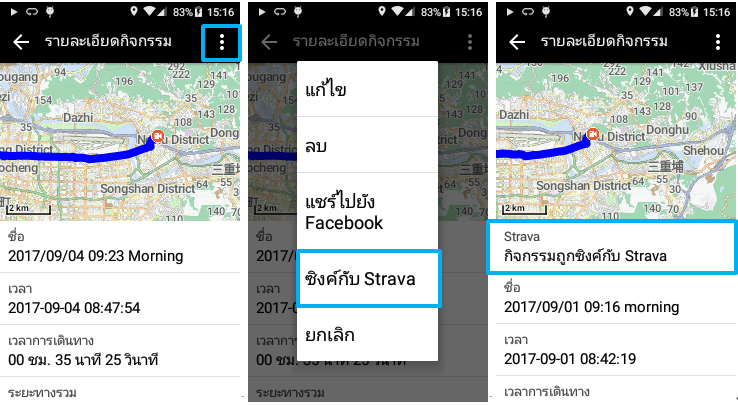
2017.09บความเปลี่ยนแปลงใน X5 RC161. สามารถเชื่อมต่อกับ Strava ได้แล้ว - หลังจากล็อกอินเข้าสู่บัญชีผู้ใช้งาน Strava ของคุณจากเมนู Setting ในหน้า System บันทึกกิจกรรม X5 ของคุณที่อยู่ใน Xplova จะถูกอัปโหลดไปยัง Strava โดยอัตโนมัติ
*X5 ไม่รองรับการล็อกอิน Strava จากบัญชี Google หากคุณใช้งาน Strava ผ่านบัญชี Google เราแนะนำให้ใช้งานเมนู “Upload to Strava”ผ่านเว็บไซต์ของ Xplova แทน ขอขอบคุณเป็นอย่างยิ่งสำหรับความร่วมมือของคุณ.
2. การอัปโหลดกิจกรรมเดียวไปยัง Strava - เลือกกิจกรรมที่คุณต้องการเชื่อมต่อไปยัง Strava จากนั้นเลือก Sync with Strava จากเมนู “...” รายละเอียดตรงช่อง Strava ของบันทึกกิจกรรมนี้จะแสดงว่าบันทึกนี้ได้เชื่อมต่อกับ Strava เรียบร้อยแล้ว.
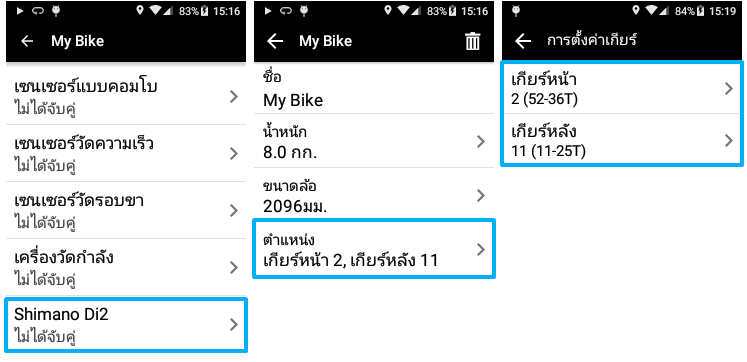
3. รองรับการเชื่อมต่อกับ Shimano Di2 และเพิ่มการแสดงข้อมูลอุปกรณ์ - เลือก Shimano Di2 จากรายการ Wireless Sensors เพื่อเชื่อมต่อเข้ากับ X5 จากนั้นเข้าเมนู Bike Setting เพื่อกรอกข้อมูลอุปกรณ์เกียร์และล้อช่วยเร่ง.
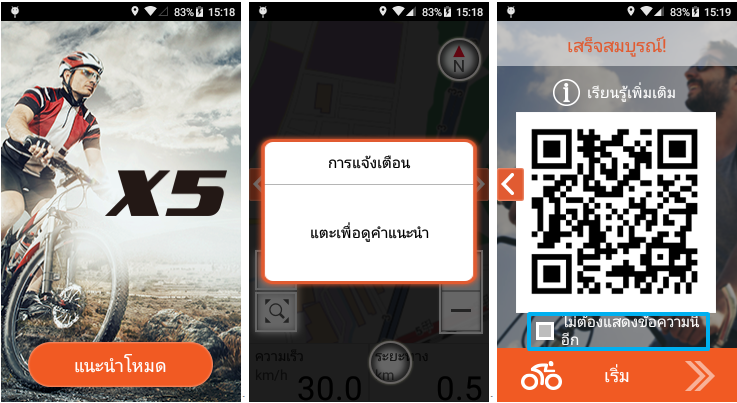
4. การสอนการใช้งานสำหรับระบบแจ้งเตือน X5 Tips และ power-up – คุณสามารถใช้งาน X5 Tips โดยเข้าจากเมนู Setting เพื่อชมการสอนการใช้งานใน Operation Mode ที่แตกต่างกัน หลังจากเข้าชมแล้ว คุณสามารถเลือกได้ว่าคุณต้องการเรียนรู้เพิ่มเติมเกี่ยวกับคุณสมบัติหรือเมนูการใช้งานไหน คำใบ้ที่เกี่ยวข้องกับการใช้งานจะปรากฏขึ้นเป็นเวลา 3 วินาทีเพื่อแนะนำคุณทีละขั้นตอน หลังจากชมการสอนการใช้งานของโหมด Device, โหมด Navigation และโหมด Training เรียบร้อยแล้ว คุณจะเข้าใจโหมด Operation ของ X5 ได้อย่างง่ายดาย
*X5 Tips จะแสดงขึ้นมาทุกครั้งที่ power-up หากคุณต้องการปิดการแจ้งเตือนนี้ กรุณาเลือก “ไม่ต้องแสดงข้อความนี้อีก” ในตอนท้ายของการสอนการใช้งาน.
5. เพิ่มฟังก์ชันการกลับไปสู่จุดเริ่มต้น - หลังจากการปั่นของคุณเสร็จสิ้นแล้ว คุณสามารถเลือกดูบันทึกการปั่นนี้ โดยเลือกเมนู “...” และเลือก “Back to Start” ซึ่งสามารถงานใช้ได้เสมอไม่ว่าคุณจะไปไกลแค่ไหน!

6. การอัพเดทซอฟต์แวร์ - คุณสามารถอ่านรายละเอียดอื่นๆ เกี่ยวกับการอัพเดทซอฟต์แวร์เพิ่มเติมได้ใน X5 Tips!
7. ติดต่อลูกค้าสัมพันธ์ - หากคุณพบปัญหาหรือข้อสงสัยเกี่ยวกับการใช้งาน คุณสามารถค้นหาข้อมูลการติดต่อลูกค้าสัมพันธ์ในภูมิภาคของคุณได้จากเมนู X5 Tips นอกจากนี้คุณยังสามารถสแกน QR Code ในเมนู Contact Us เพื่อดูช่องทางการติดต่อเราได้อีกด้วย!
8. เพิ่มไอคอนขนาดใหญ่สำหรับฟังก์ชันเริ่มการออกกำลังกาย (Start Workout/Lab) เพื่อให้คุณทราบว่า X5 เริ่มบันทึกความเคลื่อนไหวของคุณแล้ว!
9. คุณสามารถเลือกและจัดเรียงวิดีโอของคุณได้ตามใจชอบได้ที่เครื่องมือตัดต่อวิดีโอ (Video Editing Tool).
10. เมนูภาษาฝรั่งเศสและดัตช์พร้อมใช้งานแล้ว.
11. เพิ่มลักษณะการคำนวณความหนักในการปั่นในเมนู Power - โดยเพิ่ม Power-Normalized Power (NP) และ Power-Intensity Factor (IF) เข้ามาเพื่อการออกกำลังกายที่มีประสิทธิภาพมากยิ่งขึ้น.
12. ตั้งค่าง่ายขึ้นโดยการเลือกชุดอุปกรณ์ของคุณจากรายการอุปกรณ์ที่มีมาให้ล่วงหน้า.
13. แก้ไขข้อมูลของคุณได้ด้วยเมนูแก้ไขเบื้องต้น โดยกดค้างไว้ที่ข้อมูลที่คุณต้องการแก้ไขเพื่อปรับแต่งรายละเอียด.
14. แก้ไขจุดบกพร่องอื่นๆ ในการใช้งานและปรับปรุงระบบโดยรวม.
-
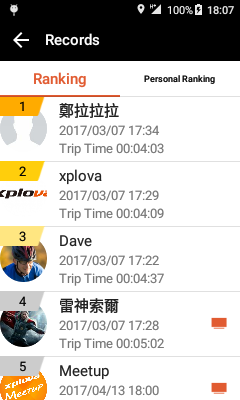
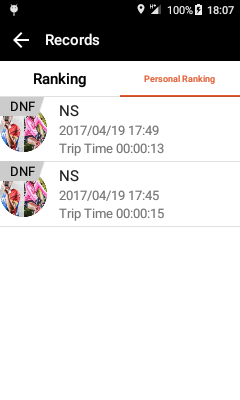
2017.04บความเปลี่ยนแปลงใน X5 RC101.Route ranking: Now you can select a route to check how you and your friends fare against others in the route ranking. Tap on Personal Ranking to see if you are in the short list, or tap on Overall Ranking to check everyone else. If you didn’t finish more than 90% of the route, the sign “DNF” will be shown on your records in the Personal Ranking and this record won’t be shown in the Overall Ranking. You could challenge the route again and reach the completion rate of 90% to get your records in the ranking!

2.Auto-REC improvement: When auto-REC is on and while video is recording, a red button will pop up on the screen. You can tap this button to deactivate auto-REC for this ride. When you start a next workout, it will go back to your original settings.
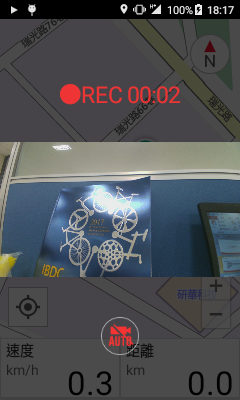
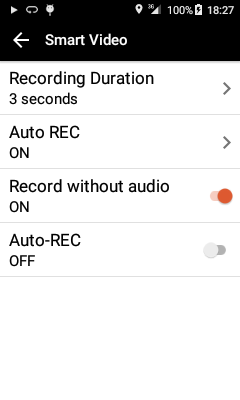
3.Record without audio: Taking video will now default set to be “record without audio”. You could go to smart video settings to change the setting if you want to record with audio.

4.New language: Thai
5.Other bug fixes and improvements.
-
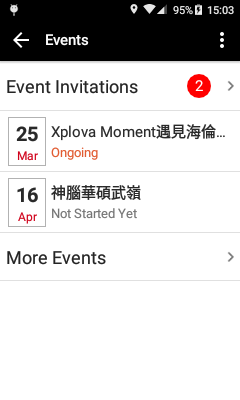
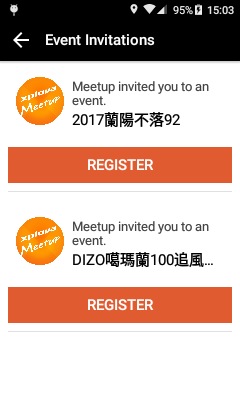
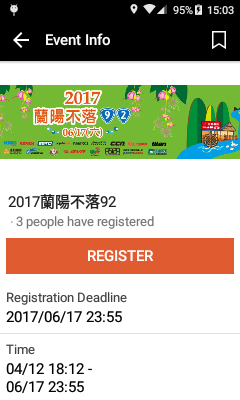
2017.03บความเปลี่ยนแปลงใน X5 RC091. Event Invitation Notifications: Event invitations you received will now be shown on X5, so you can easily view and join the events.
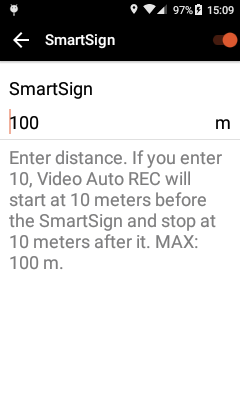
2. SmartSign & End Point Auto REC: Smart videos can be triggered once riders approach the SmartSigns or end points at predetermined distance.
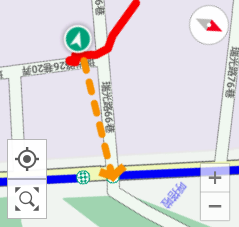
3. Off-course Route Guidance: Riders who go off course will now be automatically directed back to the route by a helpful arrow shown on screen. You don't have to worry getting lost anymore!
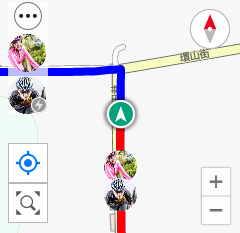
4. Fellow riders' status(offline/pause/idle) will be shown on Live Tracking/Event Tracking pages to keep you always informed of their real time conditions.
5. The green dot showing your location now also indicates your direction with an arrow pointed forward.
6. Maps update (Germany, Russia, Taiwan)
7. Add "Confirm" request on screen when riders press STOP to avoid quitting workouts accidentally.
8. Add guidances to the start point when activating challenge mode.
9. Improvements and bug fixes when the map is heading forward.
10. Other improvements and fixes.
-
2016.12บความเปลี่ยนแปลงใน X5 RC061. Challenge Mode: Now, you can challenge any public records or your past records and friends' public records! Moreover, you can see the relative position and distance of each others, etc..

2. Route Guidance*: Getting turn by turn navigation guides ahead within proper distance before reaching any road forks.
3. Event tracking: Join the event and start to ride. You can view and track each other’s positions in the navigation mode as soon as they all join the event and start riding!
4. Add custom data fields (Lap Power, Lap Max Power,L-Lap Power,L.L Max Power, Lap Max Cad. and L.L Max Cad.).
5. German and Italian language operate and display.
6. Hong Kong map available for download.
7. Auto-upload and adding multiple videos functions are available now.
8. The correction and improvement of other operational issues.
*Note: The Route Guidance prompts feature has added more graphical guidances. Please re-enter the personal route editing screen, click the desired routes then save it again to get the most updated graphic guidances. (Creating or Editing route under "Start-End direct-connected mode" will not be supported by this feature)